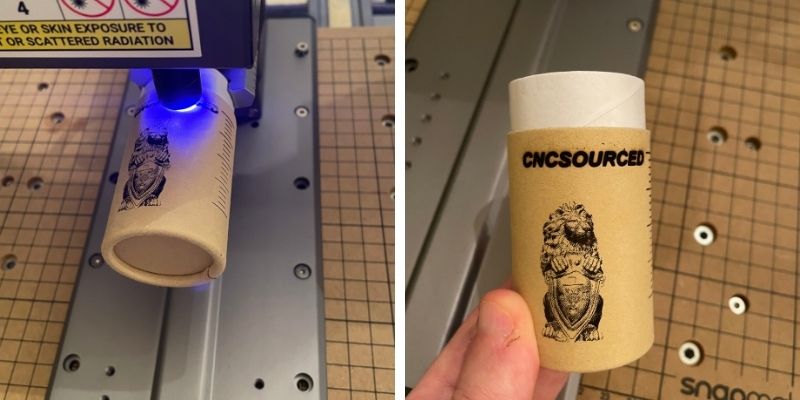
If you’re looking for the best laser engraver, you’re in the right place. I’ve tested and reviewed almost every popular laser engraver and laser cutter out, and I’ve included pictures of these hands-on tests in each laser product review.
|
Best Diode Pick

|
Best Desktop CO2 Pick
|
Best Laser For Craft Shows
|
|
CNCSourced Rating: |
CNCSourced Rating: |
CNCSourced Rating: |
|
4.8
|
4.7
|
4.5
|
|
$629.99
|
$4399
|
$1799
|
|
Laser Power:
10W/20W/40W versions
|
Laser Power:
55W
|
Laser Power:
10W & 2W
|
|
Laser type:
Diode
|
Laser type:
CO2
|
Laser type:
Diode and Infrared
|
|
Working Area:
432 x 406 mm
|
Working Area:
600 x 308 mm
|
Working Area:
115 x 115mm
|
I’ve summarized my favorites at the top – I think the xTool D1 Pro is the best laser engraver under $1000 right now with excellent performance and accuracy.
But, if you have the budget then I recommend the xTool P2 as the best desktop CO2 laser for your side hustle or small business. It has curved surface engraving features for bowls, spoons and other popular products to sell, can cut 20m acrylic in a single pass, and I personally really like the Smart Fill batch processing features.
At the end of this article I’ve deep-dived into everything you should consider when buying a laser engraver, as well as some FAQs, a software and materials guide, and more. But feel free to email me if you want me to add anything else, or test a new laser to review!
| Laser Cutter | Work area | Power | Price | Where to buy |
|---|---|---|---|---|
| xTool D1 Pro 10W | 432 x 406 mm | 5W / 10W / 20W | $699 | xTool here |
| Snapmaker 2.0 A350T | 320 x 320 x 350 mm | 1.6W / 10W | $1,100+ | Snapmaker |
| xTool F1 | 115 x 115mm | 10W & 2W | $1,700+ | xTool here |
| xTool P2 | 600 x 308 mm | 55W | $4,399 | xTool here |
Having tested many of the best laser cutters and engravers, we created our recommendations for the best laser cutting machines in each price range, for each use, and more. I also link to some of my detailed hands-on reviews, such as for the Snapmaker 2.0, Ortur Laser Master 3, and more.
CNCSourced is reader-supported. When you buy through links on our site, we may earn an affiliate commission. Learn more
The Best Laser Cutters & Laser Engravers Reviews
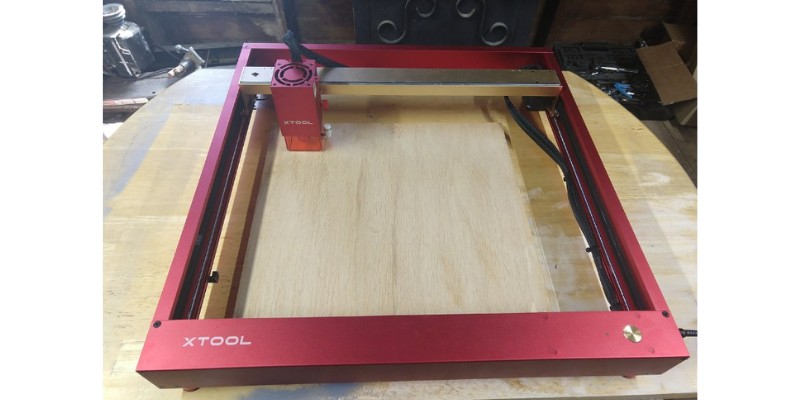
1. xTool D1 Pro 10W – Best Diode Laser & Best Laser Under $1000
- Price: $699 — Available at xTool here
- Rotary Attachment: xTool here
- Work area: 432 x 406 mm
- Laser power: 10W (5W, 20W, and 40W also available)
- Assembly Time: 30 minutes
- Max Engraving Speed: 400mm/s
- Precision: 0.01 mm
Pros
Best build quality of any diode laser engraver under $1K.
20W, 10W, and 5W options – and they’re all reliable and effective.
Performed excellently in my hands-on review
Cons
More expensive than the OLM3 (but better, just).
The xTool D1 Pro 10W is the best diode laser under $1,000 in my opinion, and it outperforms my Ortur Laser Master 3. I own both, and the xTool has a better-quality steel frame. Though Ortur’s YRR roller was under $100 when I bought it, whereas the RA2 Pro for the xTool was just under $300, everything else about the xTool is better.
The xTool D1 Pro 10W uses dual 5W lasers to create the end result of 10W power, in the same way that the Ortur LM3, and Snapmaker’s 10W laser add-on do.
But with the xTool you get more choice: you can buy the souped-up 20W version for cutting up to 10mm basswood (and acrylic). I personally got the 20W one but 10W is still more than enough for home projects. There’s now even a 40W version you can buy for around $1100 as a standalone accessory.
Other variations available include:
- xTool D1 5W — Available at xTool store here
- xTool D1 20W — Available at xTool store here
- xTool D1 40W — Available at xTool store here
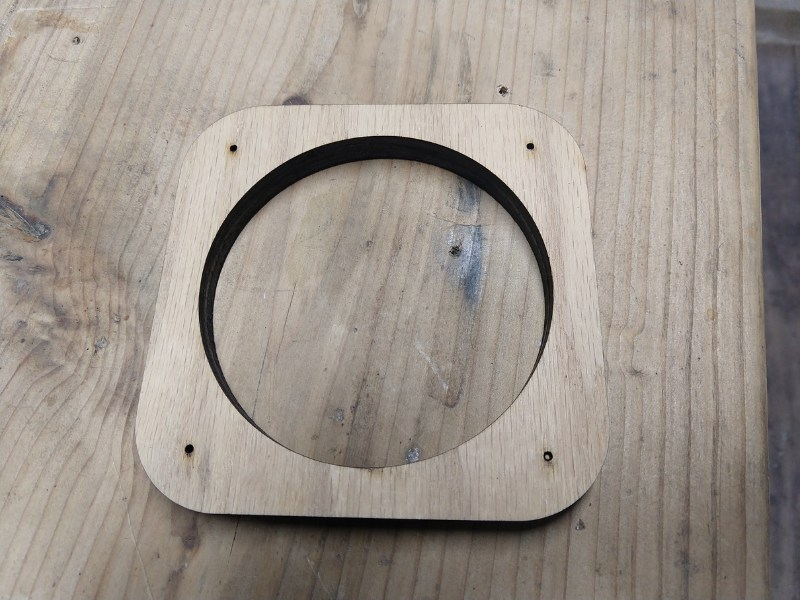
I bought the higher power 20W version, and it cuts through even 0.5-inch thick wood with ease. Here’s some projects I tried it out on:
The work area is larger than the Ortur too, but only by around 5%. But, you can buy an extension kit that takes your work area up to an incredible 936 x 432 mm for enormous engravings. You can also read my full xTool D1 Pro laser cutter review.
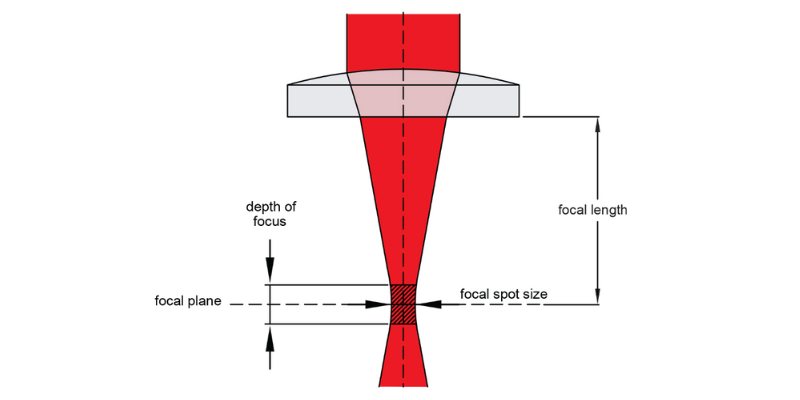
It’s accurate (0.01mm precision, 0.08 x 0.06 mm spot size), reliable with the sturdy frame and steel wheels and rods and protected belts, and safe. The XCS software that comes with the xTool is also really user-friendly, but you can also use it with LightBurn instead. There’s the Laserbox iOS app for connecting via iPad or similar device.

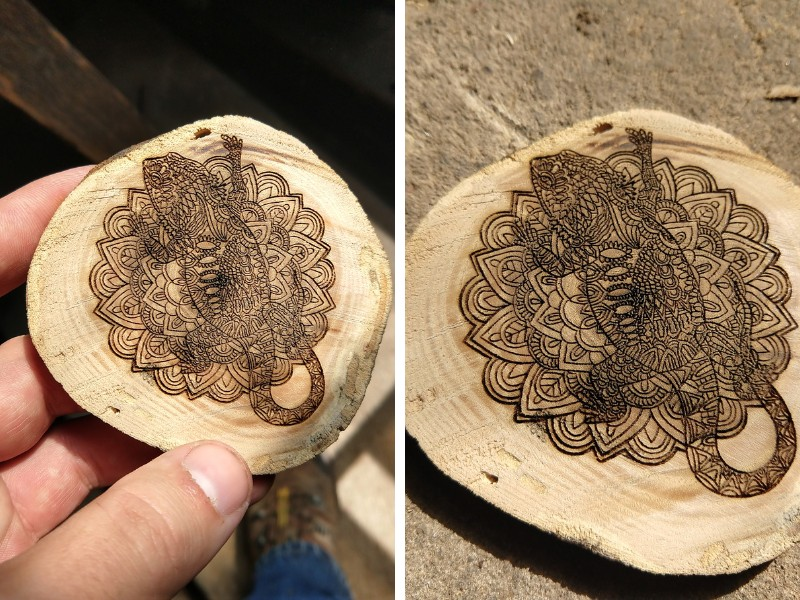
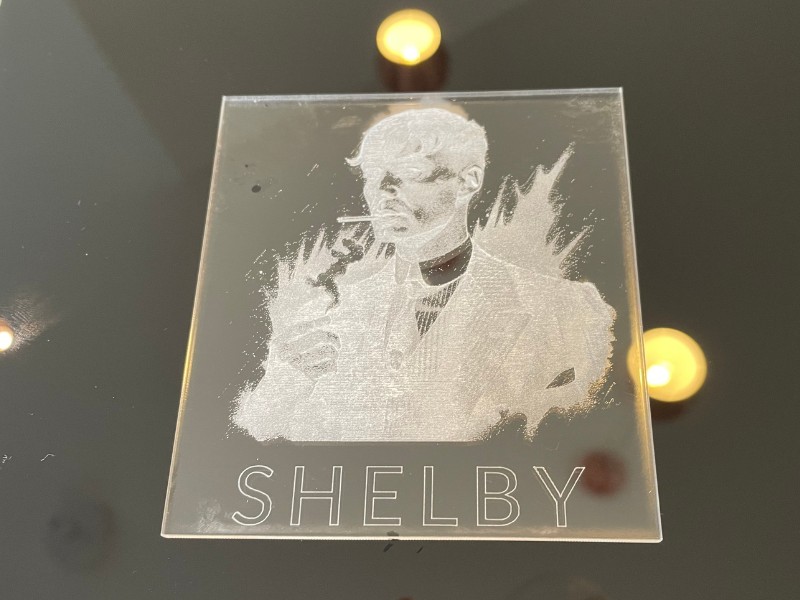
In my opinion this is the best diode laser under $1,000, and ideal for fun projects, cutting acrylic or wood, and for starting a small side-hustle on Etsy engraving signs or images, as well as cutting coasters, jewelry, or other fun projects.
And if you need even more power, go for the 20W version (we did!)
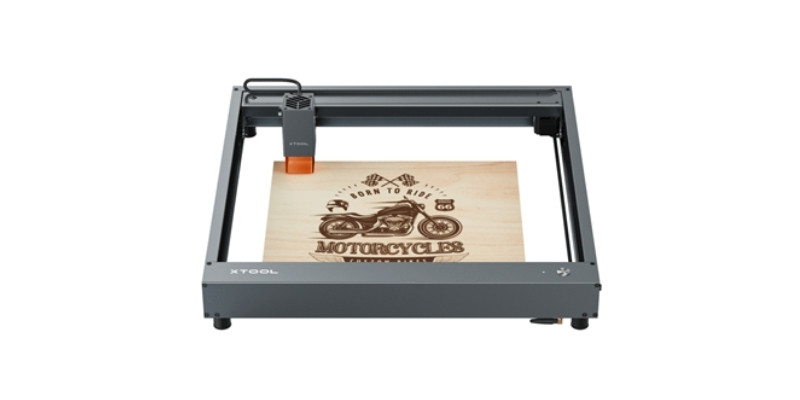
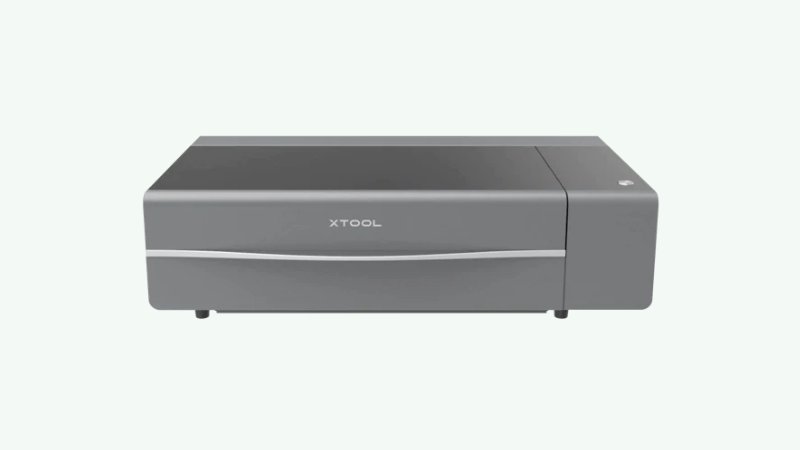
2. xTool P2 – Best Desktop CO2 Laser
- Price: Check at xTool here
- Working area: 600 x 308 mm
- Laser type: CO2
- Power: 55W
Pros
55W power: most power for the price, and more power yet cheaper than the Glowforge Pro.
Versatile: rotary options, and a riser base and conveyor feeder for taller and up to 118″-long material sheets.
Curved surface engraving: use the 16MP dual sensors to engrave on spoons, bowls and other uneven surfaces.
Ideal for businesses: the batch processing features automatically align your design on all other workpieces in the processing area.
Cons
Larger spot size than the xTool D1 Pro.
In my opinion, the xTool P2 is the best desktop CO2 laser right now. The 55W power is excellent and can cut through 20mm acrylic or basswood in a single pass.
This is more powerful than the Glowforge Pro’s 45W, and it’s also much faster than the Glowforge, at 600mm/s for the xTool vs around 200-300mm/s for the Glowforge (Glowforge doesn’t publicly say the speeds, so this is an estimate).
I bought the xTool P2, the RA2 rotary, the riser base to give me 8.5″ material height, and the conveyor feeder, and the total is still less than the Glowforge Pro costs on its own.
The only area the xTool P2 loses out to the Glowforge Pro is in DPI, as the Glowforge has 1355dpi vs 1000dpi on the P2.
It’s ideal if you’re starting a small business, with the Smart Fill features in XCS automatically aligning your designs on all other workpieces once you’ve aligned one correctly. You can see this in action below:
Another game-changing feature on the xTool P2 I found during my hands-on testing is the curved surface features.
Because the P2 has two cameras including depth sensors, it can create a 3D mesh of the surface you plan to engrave on. Then, it can adapt your design so that it engraves perfectly even on uneven surfaces.
Here’s an example of a wooden spool I engraved using this:
And for more info, here’s my video on this:
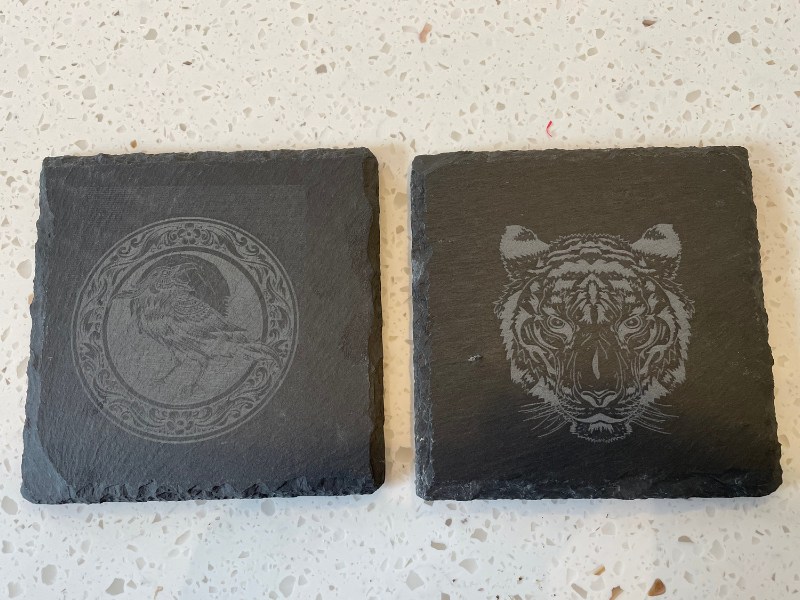
You can cut clear acrylic with ease with the P2 (diode lasers can’t cut clear acrylic, just black acrylic), as well as quickly cutting through leather, wood, and engraving slate.
I found it to be very quick, reliable, extremely powerful, and the XCS software is surprisingly easy to use. I expected to want to go straight back to Lightburn (you can also use Lightburn with the xTool P2 if you prefer), but really enjoyed using XCS.
The only downside to a CO2 laser like the xTool P2 is the larger spot size. The xTool P2 has a 0.15×0.2mm spot size, whereas the D1 Pro has 0.08×0.1mm. So, for very intricate projects you may want to use the xTool D1 Pro instead.
However, as you can see below in the slate engravings I did, it is still very much capable of very precise details.
Overall, I think it’s better than the Glowforge, the Gweike, and OMTech Polar, and if you have the budget and want to launch your side-hustle, it’s the best desktop CO2 laser right now. You can also read my full xTool P2 laser cutter review.
Simple the best CO2 desktop laser right now. You can buy this, the rotary, riser base, and the automatic conveyor feeder, and it's still cheaper than a Glowforge Pro.
It's more powerful than competing lasers at 55W, can cut 20mm thick wood in a single pass, and the batch processing and curved surface engraving open up new possibilities for your business.
- Large processing area
- Powerful 55W laser cuts 20mm thick material in a single pass
- 16MP dual cameras autofocus for easy project preparation
- Curved surface engraving in XCS
- Batch processing features
- Can't use all features in Lightburn (but XCS software is really good now)
- Mirrors/lenses may be out of focus from transport and require fixing
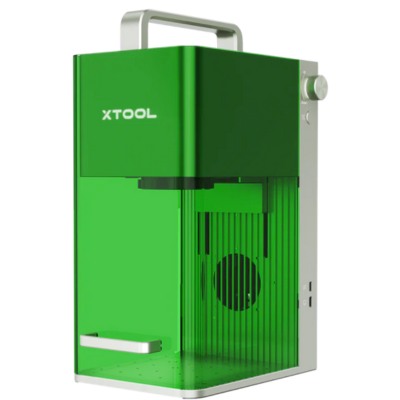
3. xTool F1 – Best For Portable Engraving
- Price: Check latest price at xTool here / Check latest price at Amazon here
- Working area size: 115 x 115mm
- Laser power: 10W & 2W
- Laser type: diode and infrared
- Weight: 4.6kg
- Engravable materials: wood, acrylic, leather, rubber, card, plastic, glass, stone, ceramic metals
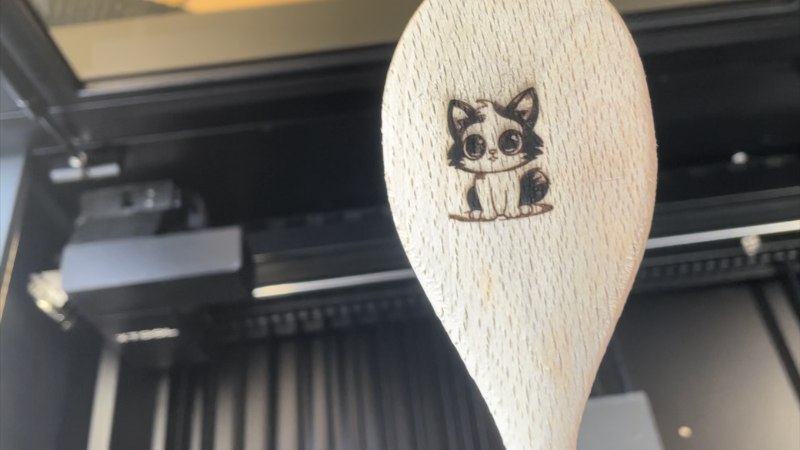
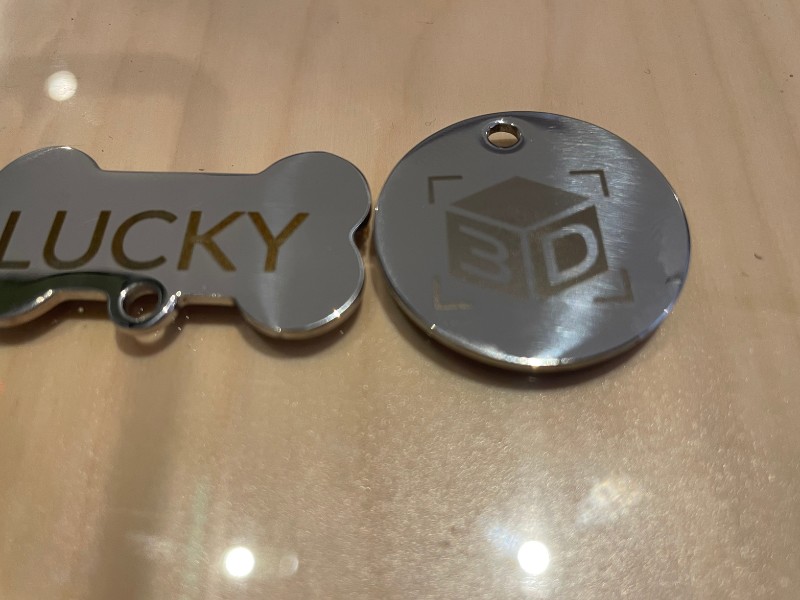
The xTool F1 is the best portable laser engraver I’ve used (by some distance!). It is much easier to use than all the LaserPecker lasers I have tested. It has everything you need to really make an impression at trade shows and other events.
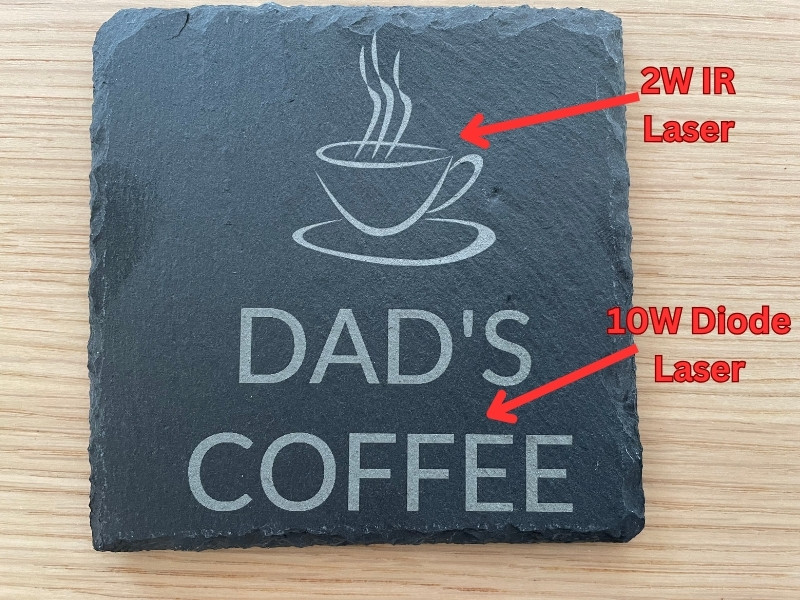
It has both a 10W diode laser and a 2W infrared laser. I used the diode for engraving wood (up to 8mm), acrylic (up to 5mm), glass, leather, and rubber, and the infrared laser for metals like engraving stainless steel and aluminum jewelry and business cards.
I tested the 2W IR laser against the diode laser for engraving slate, and the IR laser produced more detailed, consistent, and a lighter shade of engraving. So I recommend using this for slate tile engraving for trade shows!
The F1 is also one of the fastest mini laser engravers capable of reaching up to 4,000 mm/s, so you can quickly knock out projects at shows. Not only that, but it’s also incredibly precise – with an achievable accuracy of 0.0019mm for raster engraving, and 0.3mm for vector engraving.
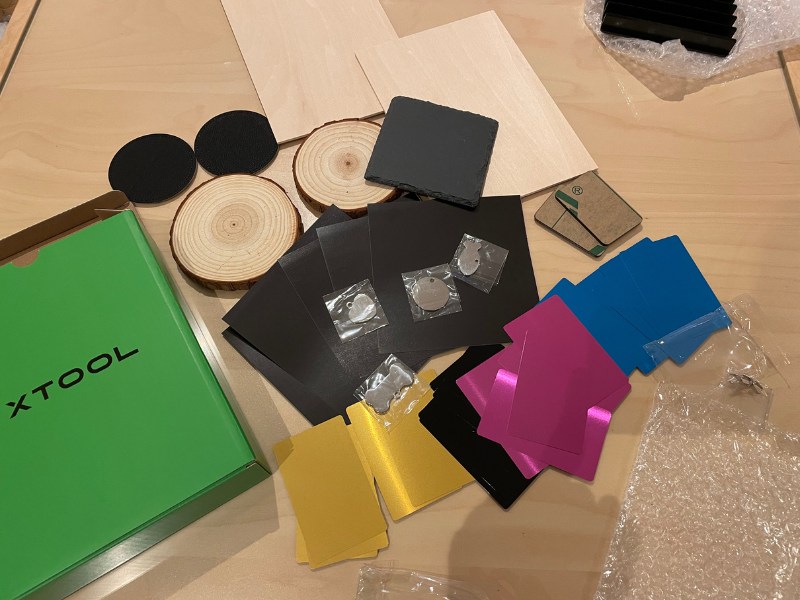
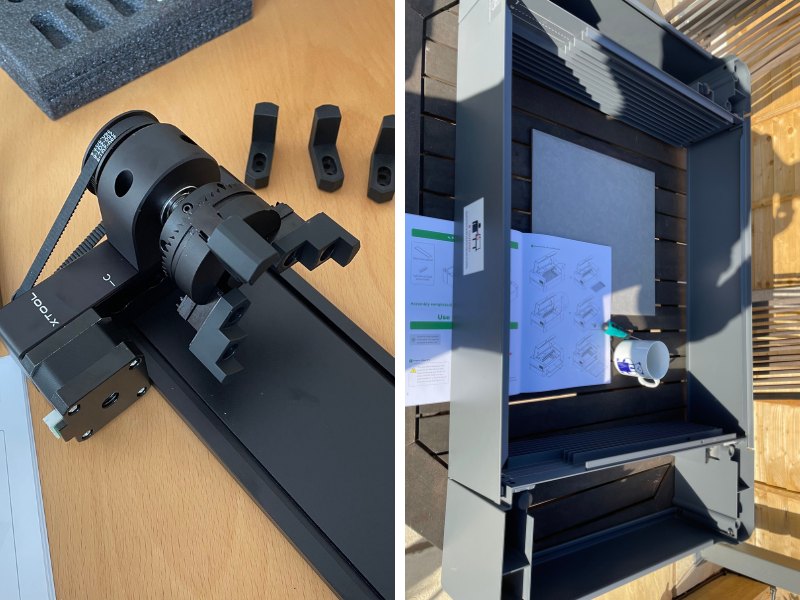
This laser is super lightweight and has a standard working area of 115x115mm, but this can be increased to 400x115mm with the xTool Slide Extension. There’s also a rotary attachment accessory with four modules, that I used to engrave cylindrical objects like glasses.
Of course, as a mini laser the xTool F1 isn’t suitable for medium or large-sized projects, and it’s less powerful than many desktop engravers. However, if you’re specifically looking for an easy portable laser that’s sure to impress at trade events, you can’t go wrong with it.
It's portable and easy to carry to craft and trade shows, and it's the best laser for on-demand custom laser engraving overall. No laser matches its 4000mm/s speed, and the IR laser makes metal engraving a breeze. I highly recommend the xTool F1.
- Super fast
- Portable - weighs 10lbs
- Versatile - diode and IR laser
- Small working area
- High price
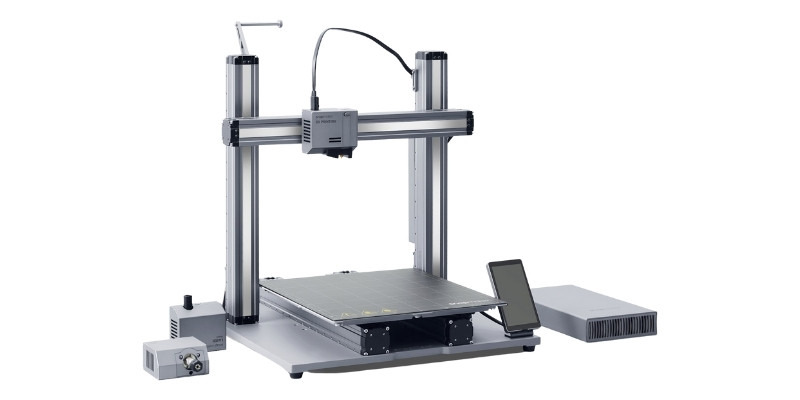
4. Snapmaker 2.0 AT with 10W Laser Cutter Add-on, or Snapmaker Artisan – Best 3-in-1 Laser Cutters
- Snapmaker 2.0 price: Best price on Snapmaker Store here / Also Available on Amazon here
- Snapmaker Artisan price: Check latest price at Snapmaker here
- Rotary Attachment: Amazon here
- Cutting area: A150 = 160 x 160 x 145 mm / A250 = 230 x 250 x 235 mm / A350 = 320 x 350 x 350 mm
- Power: 1.6W by default, 10W high-power option available
- Assembly Time: 60-80 minutes
Pros
Snapmaker make the best 3-in-1 CNC/laser/3D printers. And there’s no competition.
10W high-power laser add-on cuts decently thick acrylic and wood, and can comfortably engrave on anodized aluminum.
Cons
Less specialized for laser cutting and engraving specifically.
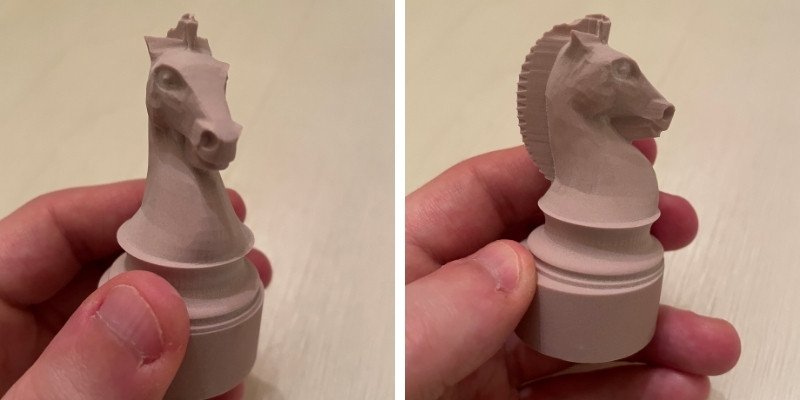
I previously tested and reviewed the Snapmaker 2.0 A350T along with the 4-axis rotary module, and have since tested the 10W high-power laser module. It’s a fantasitc laser engraver that also lets you CNC cut and 3D print, and Snapmaker definitely make the best laser engraver and 3D printer combos.
But now you have the option to spend more and buy the new Snapmaker Artisan. The main upgrades between the Artisan and the Snapmaker 2.0 are:
- Working area: 400 x 400 x 400 mm working area is larger than even the largest A350T model of the 2.0
- Comes with the 10W high-power laser module by default, it’s a paid add-on with the 2.0
- Offers 300°C dual extrusion 3D printing, whereas the 2.0 has a single extruder
- More powerful 200W CNC carving
So, if you’re looking for a more powerful 3-in-1 machine and have the extra money, it’s definitely a great machine. I can vouch for how reliable and well-built the Snapmaker 2.0 was — it was honestly a delight to build and use.
Another massive benefit of the Snapmaker machines is they have the best rotary engraver module in my opinion. The chuck style design is extremely well built, and makes it extremely easy to either laser engrave, or CNC carve, onto curved surfaces.
Snapmaker Luban makes this easier than any other software I’ve used like Lightburn or LaserGRBL, so even a beginner could do it. But, you pay for this convenience as Snapmaker’s 4-axis rotary module is a lot more expensive than xTool’s or Ortur’s.
Both Snapmaker laser engravers area great for engraving and cutting, especially with the 10W high-power laser, and you get access to 3D printing and CNC in one machine, so if you want a more versatile machine, this could be ideal for you.
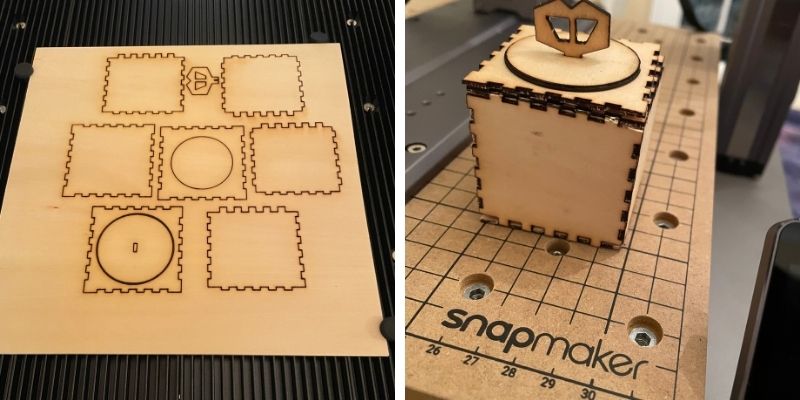
We used the 4-axis rotary module add-on, turning the laser engraver and CNC carving modules into a 4-axis turning lathe, and managed to carve out some beautiful looking pieces, as well as engraving a cylindrical gift box.
3D printer part prints standard filaments like PLA, ABS and TPU. You can print remotely via WiFi as well as using the USB port, and the touchscreen makes the Snapmaker 2.0 easy and efficient to navigate and print with. If you run out of filament mid-print, the filament detector will automatically pause your print so it doesn’t get ruined, so you can then insert another spool and keep going.
Overall, it’s a great all-in-one laser cutter option that can handle all your basic CNC and 3D printing needs in one versatile package, and we highly recommend it.
Want to 3D print, CNC cut, and laser cut and engrave all in 1? Snapmaker machines are the best 3-in-1 machines around.
Lasers That Didn’t Make The List
We’ve tested and owned more than a dozen lasers over the last couple years, including some that didn’t make this list.
Here are some that didn’t make it, with links to the full review if you want to read more:
- Longer Ray 5
- Two Trees TS3
- Two Trees TTS-55 — this made our best cheap laser ranking though!
- Ortur Laser Master 3
How To Choose The Right Laser Engraver For You

Price – what’s your budget?
The cheapest diode laser engravers start at under $300, but a good-quality 10W diode laser like the xTool D1 Pro starts at $700.
More powerful CO2 lasers generally start at around $2,000, but for a more powerful 50W+ laser you should expect to pay $5,000+. Fiber lasers start at $3,000-$5,000 for 30W lasers, but you should get a 50W+ power laser for effective metal engraving. I break this down in more detail in my laser cutting cost breakdown article.
For a powerful 100W+ CO2 laser, these will run into the $15,000+ range for a top model from manufacturers like Boss Laser, Trotec, Epilog, and Thunder Laser.
Think carefully about your current AND future needs when choosing. For example, you might get more ambitious as you go, or want to cut larger.
Laser power – what materials do you want to cut?
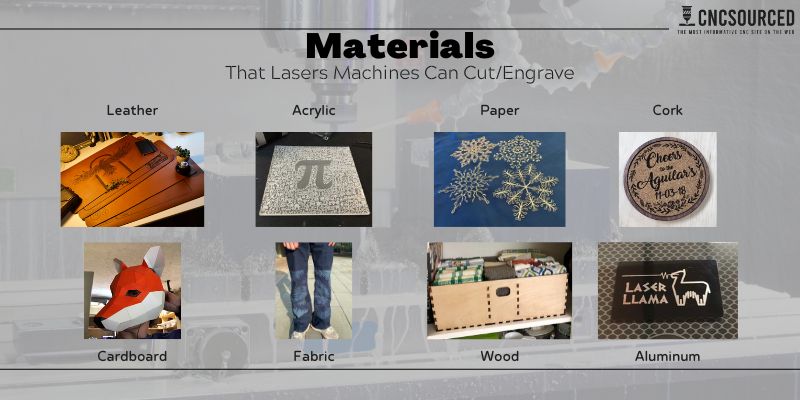
Generally, these are the materials lasers can cut and engrave:
| Material | Can it cut? | Can it engrave? |
|---|---|---|
| Leather | ✅ | ✅ |
| Acrylic/Plexiglass | ✅ | ✅ |
| Paper | ✅ | ✅ |
| Cork | ✅ | ✅ |
| Fabric | ✅ | ✅ |
| Cardboard | ✅ | ✅ |
| Wood | ✅ | ✅ |
| Aluminum | ✅ | ✅ |
| Glass | ✅ | ✅ |
| Stainless Steel | ❌ | ✅ |
| Stone | ❌ | ✅ |
| Ceramic | ❌ | ✅ |
| Bone | ❌ | ✅ |
The main factor for cutting materials is laser power. With more power, you can cut thicker materials, and at faster speeds – which is essential if you’re running a small business.
Be wary however. Some companies claim their lasers are 20W or 40W when they’re actually 5.5W. This is because they add the power supply and present it as the power, and I’m personally not a fan of this practice and find it misleading. The xTool D1 Pro and Ortur Laser Master 3 are actually 10W diode lasers and I recommend these.
A 10W diode laser can cut fairly thin wood and acrylic sheets, and engrave coated metals. A 40W CO2 laser can cut thicker wood and acrylic (and can cut clear acrylic), and do so much faster. Only very powerful industrial fiber and CO2 laser cutters can cut metals, and these are $100K+ industrial machines.
| Laser Engraving Machine | Power |
|---|---|
| xTool D1 Pro | 5W, 10W, 20W, and 40W |
| Snapmaker 2.0 A350T | 1.6W default, 10W add-on |
| xTool F1 | 10W diode and 2W IR |
| xTool P2 | 55W |
Speed (both for laser cutting, and engraving)
Fast engraving speeds mean you can hammer out engraved images and other projects faster. With speed, you can engrave faster if you don’t want a too-dark contrast.
Speed is just the maximum speed your laser will move across each axis — it doesn’t mean it’ll be able to cut right through the material.
So, don’t confuse the theoretical maximum engraving speed with cutting speed. Cutting speed is dependent on how powerful your laser is, and the material you’re cutting. The laser might say have 600mm/s max speed, but to cut thick wood and acrylic, you will need to reduce this potentially down to 1mm/s.
Different laser engravers have different optimal speeds, and you can test your laser engraving machine with test cuts.
Size – work area
If you want to engrave larger images and other designs, you’ll need a large-format laser cutter. But if all you plan to engrave are small jewelry trinkets or leather patches for beanies, then you don’t need a larger work area.
You can buy extension kits for a lot of common diode lasers like the D1 Pro and Ortur LM3. These extend one of the axes to usually around double the length, meaning you can put 800mm+ wide materials through it. There are also upgrades for some CO2 lasers such as the xTool P2 to put longer material sheets through, with the P2 offering an automatic conveyor feeder for up to 118-inch length material sheets.
Ease of use
If you’re a beginner to laser cutting, the last thing you want is a complex machine with complex laser software that you can’t understand.
I have owned 3 Ortur lasers (LM2, LM2 Pro, and LM3), the xTool D1 Pro 20W, xTool F1, xTool P2, xTool S1, and a host of other lasers by TwoTrees, Longer, and other brands, and my recommendations for beginners are the xTool, followed by the Ortur. Check out our article on the best laser engravers for beginners for more.
For a more professional laser cutter, the xTool P2 is great and I use mine all the time. But if you want a more commercial machine, brands like Thunder, Epilog, and Boss make reliable and high-quality lasers with less maintenance issues.
| Laser Engraving Machine | Setup Time |
|---|---|
| xTool D1 Pro 10W | 30 minutes |
| Snapmaker 2.0 A350T | 60-80 minutes |
| xTool F1 | 10-20 minutes |
| xTool P2 | 30 minutes |
Accessories and rotary attachments
Rotary attachment add-ons let you engrave yeti cups, and cylindrical objects like metal beakers, beer glasses, mugs, and more. If you’re a home maker, this exponentially increases the projects you can make.
If you’re business-minded and want to set up your own store, or start up on Etsy, then here’s a very badly kept secret: these items sell really well.
Other attachments include:
- Extension kits (both Ortur and xTool offer these).
- Enclosures (essential for keeping fumes away).
- Air assist.
- Honeycomb laser beds.
- More powerful laser heads for cutting thicker materials (for example, you can upgrade to a 20W laser head on an xTool laser – and I did this for my xTool). With a 20W diode laser, you can cut most non-metal materials, including thicker and tougher wood (up to 10mm basswood).
A Beginner’s Intro To Laser Cutting
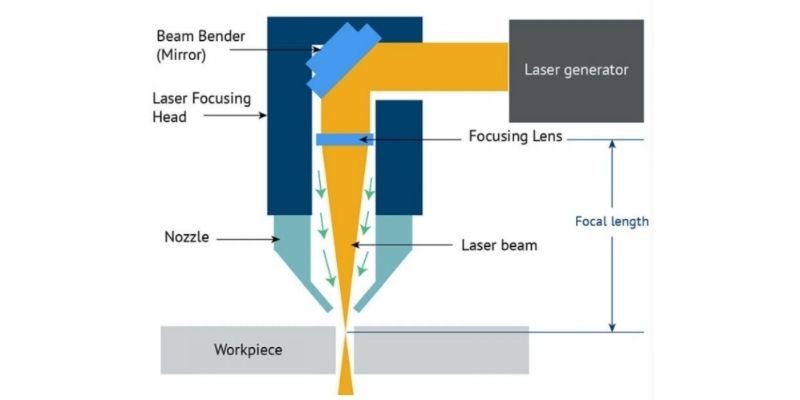
Laser cutters use optical amplification to intensify laser beams to create high-powered lasers, which are then used to cut or engrave the desired materials.
The laser head is controlled by a CNC motor system, moving the leaser head to cut and engrave your desired design or pattern. Control software instructs the laser where to move, based on the design you imported and your laser settings.
How Laser Engravers Work
Laser stands for “light amplification by stimulated emission of radion”, and basically just means: narrow and coherent light.
A laser’s job is to generate intense and focused light – and if you concentrate enough light into a single spot, it can cut and burn things like a hot sharp knife.
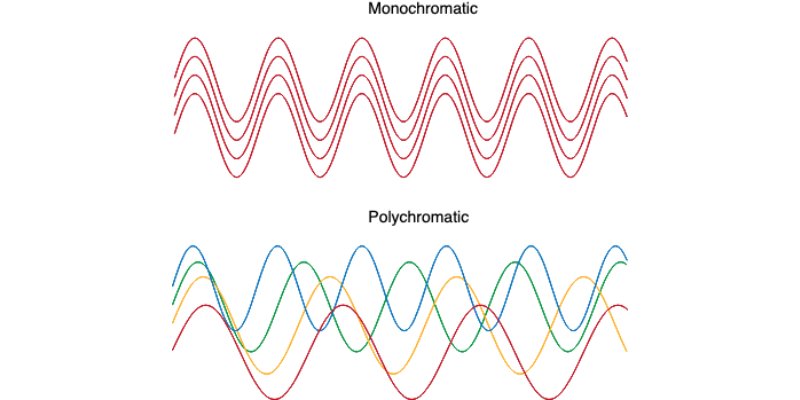
The first step is to generate light. But, not all light is good for a laser beam; we need light beams that work together. For this, we use monochromatic light: that means all the light beams have the same wavelength (as opposed to your lamp’s white light, which consists of many colors and has a wide range).
There are several techniques for producing such light for laser beams. CO2 lasers energize a combination of gases to generate light, while some diode lasers run electricity through semiconductors, and fiber lasers use light to excite fiber optics.
Then, the light travels from the source to the lenses. The lenses make the light coherent and directional. Voila, you have intensely coherent light in the output: your laser beam.
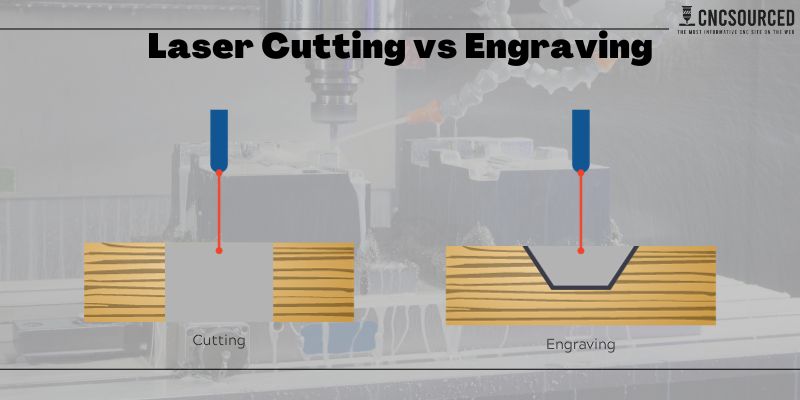
At low powers, the laser just engraves the material. This involves making the material surface so hot, that some of it evaporates, and leaves marks behind. At high power, the laser is so hot and sharp that it will cut through the material.
Types of Laser Cutters & Engravers
Diode Lasers
Diode lasers contain a small compound semiconductor material within them, and work by applying electricity to that compound to produce the laser beam.
Diode lasers are the cheapest, most portable, and most user-friendly lasers – so if you’re a beginner, they’re probably best for you.
Weaker 5W diode lasers are mostly just for engraving: you’ll struggle to cut through acrylic, or wood of any significant thickness. But more powerful 10W lasers, or even the 20W version of the xTool D1 Pro, can begin to cut much thicker wood and acrylic.
Advantages of diode lasers include:
- Light and portable: They’re the most portable, as the diode laser just includes the laser head that is then mounted on a gantry.
- Large size for the price: They can very cheaply be expanded using extension kits to create very large engraving artwork.
- Beginner-friendly: you only work with the laser head, and gantry system, and the laser control software (Lightburn or LaserGRBL) is easy to use.
CO2 Lasers
CO2 lasers are more complex but are more powerful than diode lasers. They can cut through thicker wood and acrylic, and do so much faster. They’re better for small businesses who need to quickly cut through materials and produce more sellable projects per hour. Other materials like glass, leather, and other textiles work great with CO2 lasers.
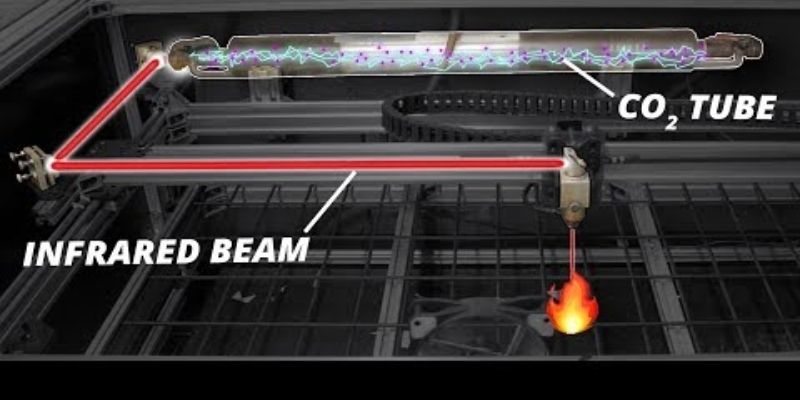
CO2 lasers work by running electricity through a gas-filled tube, which is usually a mixture of gases like CO2, nitrogen, and helium. There are mirrors on each end of the tube, one reflective and one partially reflective, that let light through for the beam.
Previously, CO2 lasers started at $2500+, but there’s now a 40W CO2 laser called the K40 which costs around just $500. However, K40 lasers are typically 8” x 12” so you can’t cut large projects for sale.
Fiber Lasers
Fiber lasers have a “laser engine” which is connected to a galvo head, which is a set of mirrors, via a fiberoptic tube. To simplify the process, the laser engine sends power and light through the fiberoptic tube to the galvo laser head, where it is reflected on to the metal surface to engrave or cut it.
They are expensive – the cheapest fiber lasers start at around $3000. But, for metal laser engraving, they’re the best. They also don’t have consumable parts like CO2 lasers, which after a few thousand hours need replacing for a hundred dollars or so. I’ve written more in my article on fiber vs CO2 lasers.
However, fiber lasers typically have smaller working areas. For example, a popular low-cost fiber laser engraver costing $3000 that I have used has a working area of just 6” x 6”, so you’re limited in the metal projects you can mark.
Software
Choosing the right laser software is key, since you’ll spend so much time using it. You’ll use the software for two things:
- Design. If you want to create customized patterns, you’ll need a vector software like Adobe Illustrator or Inkscape.
- Laser control. You’ll need the laser control software to connect to the laser and run it. You can import your images or designs into the laser software for engraving or cutting.
Some laser control software also have design tools (like Lightburn), while others do not (such as LaserGRBL).
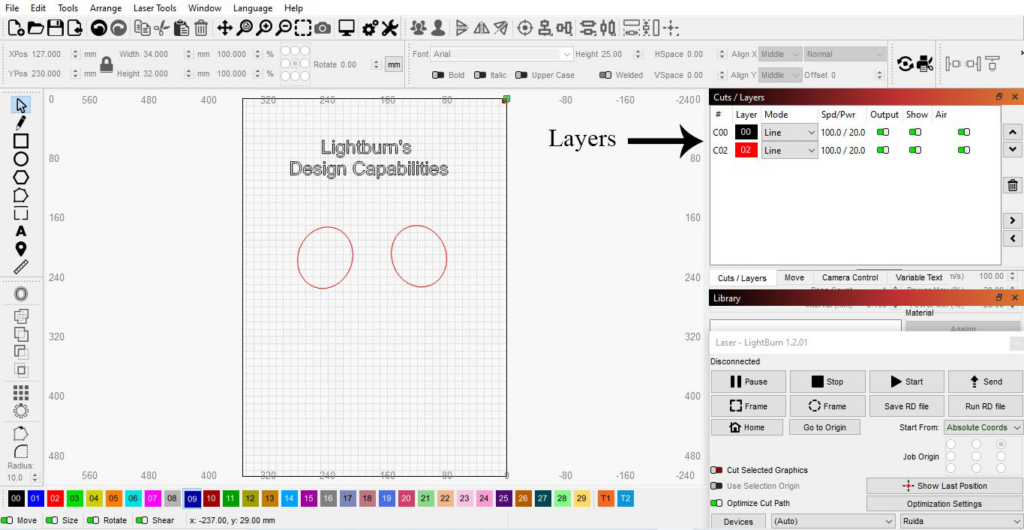
The advantage of Lightburn, therefore, is you can design your cuts inside Lightburn, as well as run your laser with it. Lightburn is the best laser software and well worth the license cost, and it works with most lasers.
Here’s an example of me designing in Lightburn, showing the text and shape drawing, and the layers feature for different laser settings on different parts of the design:
Software Compatibility
Another factor is that while you can choose the software you design in, your laser software is not entirely up to you. It depends on your laser.
Some laser manufacturers offer their own laser control software, while others also work with existing 3rd party software. For example, Glowforge only works with their in-house software, while xTool lasers work with both XCS (in-house) as well as Lightburn.

What’s Changed?
We’re always updating our reviews based on our latest hands-on testing. The first edition of this article was posted more than 3 years ago, and we’ve tested more than a dozen laser cutters to keep this updated for 2024.
Feb 2024 Updates:
- Removed Glowforge Pro, Ten-High CO2, OMTech K40. They’re not as good value for money as the current lasers we now recommend.
March 2024 Updates:
- Removed the Atomstack A5. We now recommend the xTool D1 Pro as the lowest-cost diode laser to buy.
FAQs
Are laser engravers worth it?
Laser engravers allow you to engrave realistic images on wood, cut materials like cardboard, wood and acrylic, and engrave on metals, glass and slate. They’re great for a huge range of DIY projects and crafts, and are very worth it if you have the budget wand want to create your own projects or even start a business.
What safety precautions should I take with a laser cutter?
It’s extremely important to wear protective eyewear, avoid looking directly at the laser beams, use proper ventilation/filtration, keep the machine enclosed during operation, have a properly rated fire extinguisher nearby, keep flammable materials away from the work area, and turn off the laser when not in use.
How can I improve cut quality and edge finish?
Using air assist, going slower or using multiple passes, proper lens height, clean optics, matched power/speed settings, and sharper focus will help improve cut quality.
Other laser buyer’s guides:
- Best laser engravers for glassware
- Best budget laser engravers under $500 and $1000
- The best laser engravers for wood
- Best laser for cutting acrylic
- Best laser engraver for leather
- Best lasers for engraving metal
- Best lasers for small businesses
- Best laser engravers for slate