Our article highlights the best laser engravers for engraving metal tumblers and yeti cups, in every price range and type of laser.
|
Best diode + IR laser for cups
|
Best CO2 for stainless steel tumblers
|
Best fiber laser
|
|
4.5
|
4.7
|
4.6
|
|
$1,799
|
$4,499
|
$3,024.00
|
|
Rotary Price:
$287
|
Rotary Price:
$279
|
Rotary Price:
$199
|
|
Speed:
4,000 mm/s
|
Speed:
600mm/s
|
Speed:
5000mm/s
|
|
Laser type:
Diode and IR
|
Laser type:
CO2
|
Laser type:
Fiber
|
|
Working Area:
115x115mm
|
Working Area:
600 x 308 mm
|
Working Area:
110x110mm
|
|
|
If speed and portability are your main considerations, the xTool F1 is the best laser for you. It has both a 10W diode laser, and a 2W IR laser in one package – and I found the IR laser to excellently engrave metal jewelry and tumblers.
The xTool D1 Pro with the RA2 Rotary Attachment is the best budget laser for tumbler engraving. I’ve personally used this to engrave tumblers and it works great. It pairs easily with the rotary attachment, and I also recommend the IR laser for better coated metal beaker engraving.
For CO2 lasers, I recommend the xTool P2 as the best CO2 laser for engraving tumblers and other cylindrical objects. It’s the most powerful and fastest laser in its price range, and the RA2 rotary, and riser base attachments, make rotary engraving really simple.
In this guide, I share my hands-on experience with these lasers, and compare key factors such as rotary attachment options, price, and speed and power trade-offs. I’ve also written a how-to guide for laser engraving tumblers, as well as my 7 tips for getting the absolute best results.
CNCSourced Recommends
- xTool D1 Pro with Rotary Attachment: Best for Beginners
- xTool F1: Best Mini Laser for Trade Shows
- LaserPecker 2 Pro: Fastest Under $1,000
- xTool P2: Best CO2 Laser For Tumblers and Mugs
- Cloudray QS-30 LiteMarker: Best Fiber Laser
Which Type of Laser Can Engrave Tumblers and Yeti Cups?
First, it’s important to note that tumblers are made of stainless steel, plastic, or glass. Stainless steel tumblers can also be uncoated, or have a powder coating on top.
The best types of lasers for engraving stainless steel tumblers are fiber lasers, followed by IR lasers. You can also etch stainless steel tumblers with ordinary (diode) lasers, but they’re not as good as engraving with fiber and IR lasers.
You can use any type of laser for engraving powder-coated tumblers. Using a CO2 or diode laser will only remove the thin powder layer.
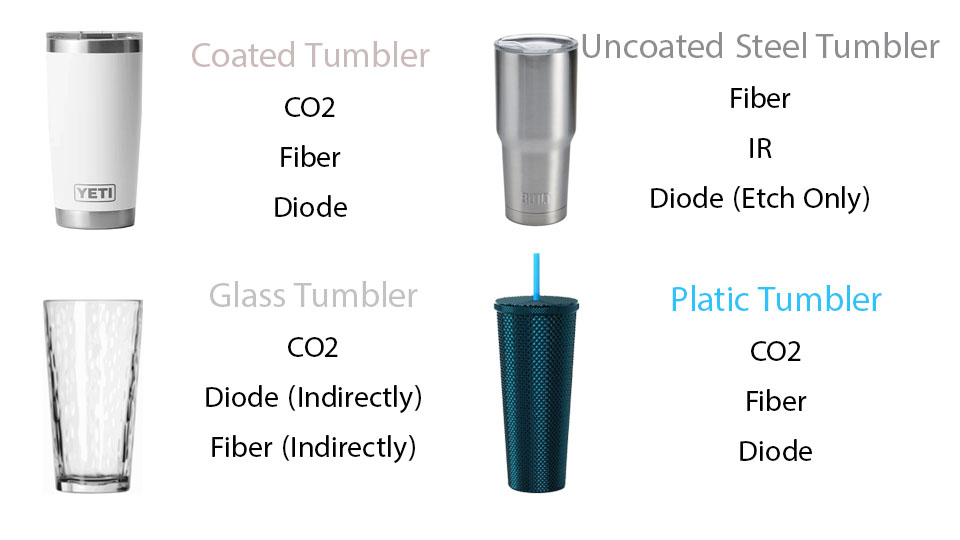
For engraving glass tumblers, the best choice is CO2 lasers, followed by fiber lasers. Diode lasers can also engrave glass tumblers with some tricks, but may not always give you good results.
Finally, for plastic tumblers, the best type of laser is CO2, but fiber and diode lasers can also engrave these well.
So, if you have to buy a dual laser machine like the xTool F1, you can engrave all stainless steel tumblers (both coated and uncoated) using the IR laser, as well as plastic and glass tumblers using the blue light laser.
The table below shows the engraving quality each laser achieves on each tumbler material:
| Laser Type | Engraving Quality on Stainless Steel Tumblers | Engraving Quality on Powder Coated Tumblers | Engraving Quality on Glass Tumblers | Engraving Quality on Plastic Tumblers |
|---|---|---|---|---|
| Diode Laser (Blue) | Mediocre (shallow and first pass gets low contrast) | Fair | Fair (indirectly) | Fair |
| CO2 Laser | Can’t directly -Mediocre indirectly | Excellent | Excellent | Excellent |
| IR Diode Laser | Excellent | Fair | Can’t | Fair |
| Fiber Laser | Super Excellent (Can even heat-mark tumblers) | Good | Can’t (directly) -Fair (indirectly) | Good |
You will also need a rotary attachment for engraving tumblers. Not all lasers support rotaries, for example Glowforge lasers do not have enough height, and others require riser base attachments to fit rotaries in.
Diode Lasers
Diode lasers are cheap, yet their low power is still enough for engraving most tumblers. There’s also multiple types with different wavelengths: blue light, and infrared (IR).
Infrared lasers are better suited to metals such as steel tumblers, while the blue light diodes are better for plastic tumblers.
Some lasers like the xTool F1 have both types of laser built in, and many companies offer a 1064nm IR laser add-on that you can switch in, and I have this 2W IR laser for my xTool D1 Pro, and xTool S1, for example.
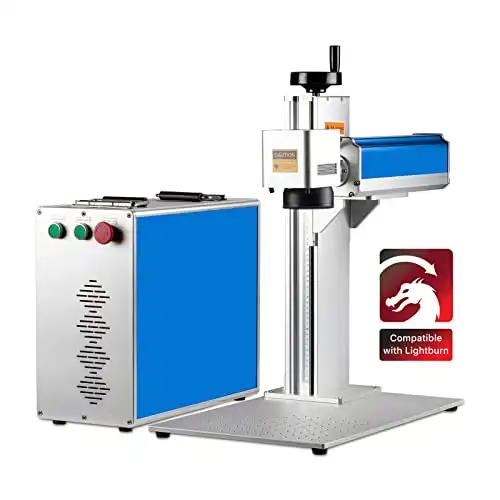
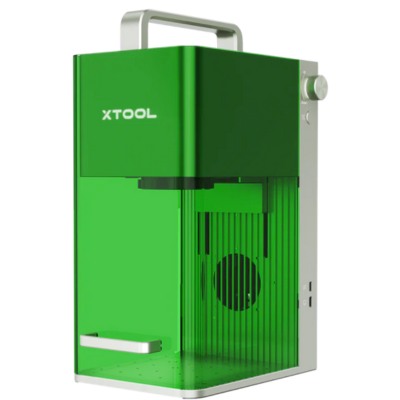
1. xTool F1 – Best and Fastest Mini Laser for Engraving Tumblers
- Price: Check latest price at xTool here / At Amazon here
- Working area size: 115x115mm
- Laser power: 10W & 2W
- Laser type: diode and infrared
- Weight: 4.6kg
- Engravable materials: wood, acrylic, leather, rubber, card, plastic, glass, stone, ceramic metals

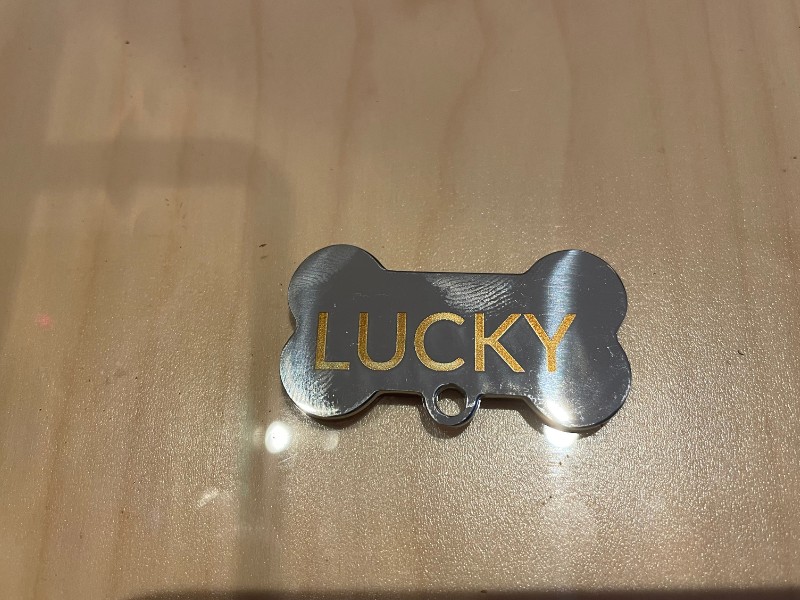
The xTool F1 is the best machine for engraving tumblers because it has both a 10W blue diode laser, and 2W 1064nm IR module mounted in the machine. The modules are integrated, so you don’t even need to switch the modules out, you just need to select which one you want to use in XCS software.
If you’re engraving metal tumblers or flasks, definitely use the IR laser – I managed to get some great engravings on the metal jewelry and business cards I tested. You can then use the blue light diode laser for plastic, ceramic and glass tumblers, and mugs.
It’s small but powerful: perfect for metal engraving and tumblers, but not ideal if you want to engrave larger projects or cut signage. For these projects, get the D1 Pro or xTool S1, but for smaller custom projects, the F1 is the best.
It’s specifically designed for being portable and bringing to craft shows. It weighs just 4.6kg, and it has a handle to easily carry it around.
It’s super fast and super accurate, with galvo technology that allows it to engrave up to 4,000 mm/s and with accuracy down to 0.00199mm. If people are queueing up at your stall and want custom designs on their tumblers, this fast engraving speed is ideal for quickly getting projects done and sold.
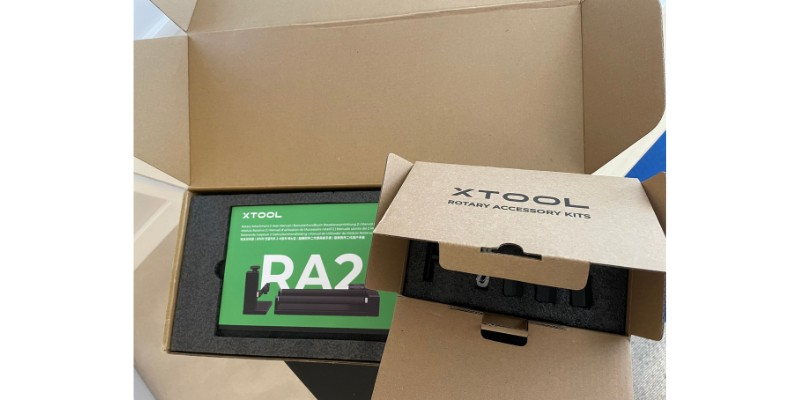
In my F1 review, I found it highly effective for engraving metal with the infrared module, while other users have showcased its capabilities for glass engraving.You’ll need to buy the RA2 Pro rotary attachment to engrave tumblers with the F1, which costs $287. You can use the rotary with other xTool lasers – for example, I use my two RA2 Pro rotary attachments across my xTool F1, xTool P2, xTool S1, and xTool D1 Pro (yes, I know, I’m a laser cutter addict).
It's portable and easy to carry to craft and trade shows, and it's the best laser for on-demand custom laser engraving overall. No laser matches its 4000mm/s speed, and the IR laser makes metal engraving a breeze. I highly recommend the xTool F1.
- Super fast
- Portable - weighs 10lbs
- Versatile - diode and IR laser
- Small working area
- High price
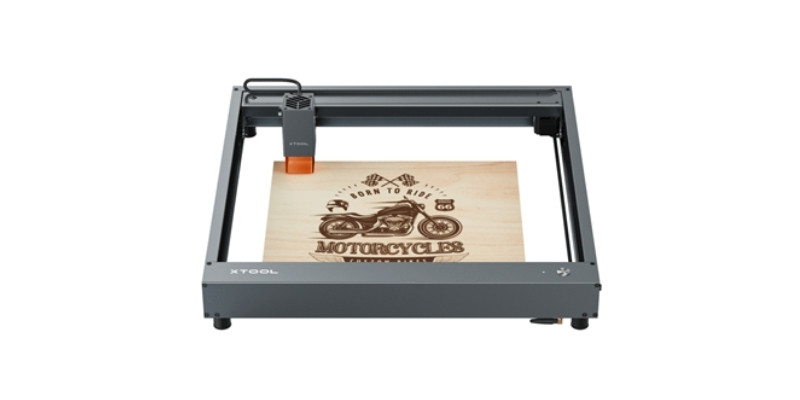
2. xTool D1 Pro with Rotary Attachment – Best If You Want To Engrave Larger Projects Also
- Price: Check latest price at xTool here
- Working Area: 430x390mm
- Rotary: Yes – $280 – Available at xTool here
- Power: 5W, 10W, 20W, 40W
The xTool D1 Pro is one of the most impressive laser engravers under $1000, and it’s ideal for engraving tumblers. I bought the 20W version, and it’s excellent – you can also read my full xTool D1 Pro 20W review, but there’s a 10W version, or a separate 40W laser head you can buy.
It’s well-made and stable, with a motion accuracy of 0.01mm for precise engraving. It engraves at up to 400mm/s, faster than my Ortur Laser Master 3.
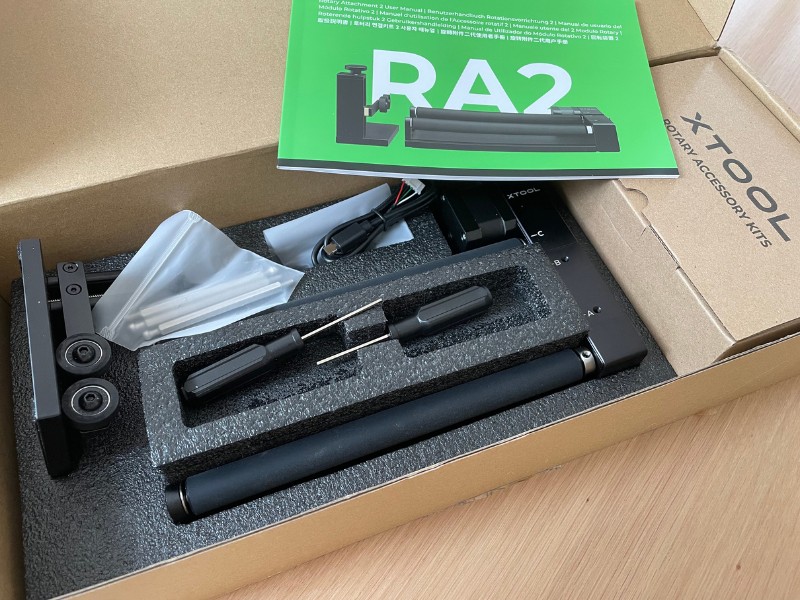
It doesn’t come with the RA2 Pro rotary accessory by default, so you’ll need to pay the extra $280 for this. It’s a lot better quality than my Ortur rotary roller, so you do get more stability for the money – but Ortur’s one is cheaper.
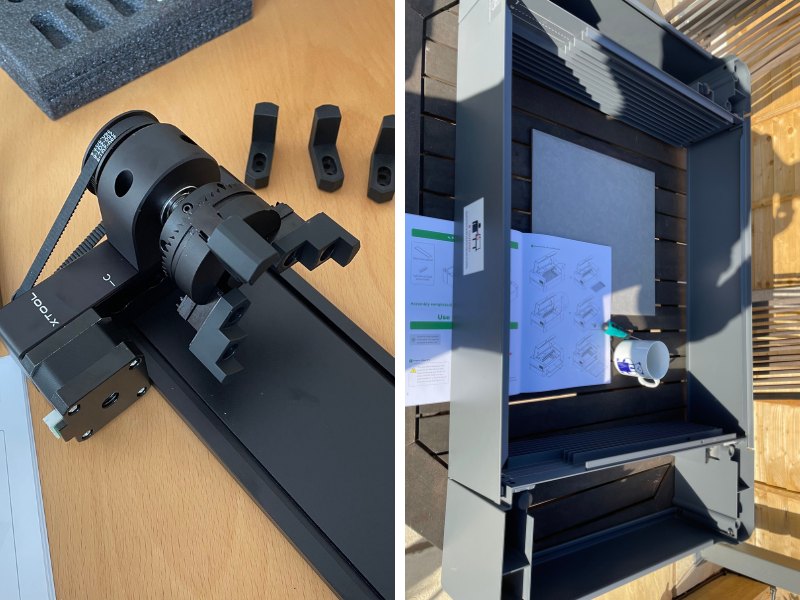
The xTool RA2 Pro is a super sturdy jaw chuck rotary that worked well when I was working with cylinders and sphere shapes. The total diameter range is 0-100mm, so it’ll fit all types of tumblers, glasses, mugs, and much more. The only concern is very tall spheres or glasses that might not fit, but I never encountered this.
You can adjust the RA2 to be a chuck rotary, a roller rotary, a sphere-engraving module, and a ring-engraving stud – so it’s extremely versatile for different projects.
The RA2 rotary attachment is compatible with the xTool P2, S1, and F1, and I use it with all my xTool lasers without issue.
If you want to engrave stainless steel cups and other metals, you’ll also need to buy the infrared laser module, a 2W IR 1064nm module specifically for metal engraving. This is the same laser head that comes in the xTool F1, and it’s also available for the S1.
If you don’t have the 2W IR laser module, there are still ways to work on anodized metals like aluminum, and stainless steel – but you’ll need to coat the product with a coating spray, and the quality won’t be as good.
And if you need even more power, go for the 20W version (we did!)
CO2 Lasers
CO2 lasers can’t directly engrave metals, though can engrave powder-coated metals pretty well. They’re the best for engraving powder-coated tumblers, and both plastic and glass tumblers.
Their only drawback is they can’t directly engrave uncoated stainless steel tumblers, unless you apply a metal engraving spray.
You’ll need a rotary, and be warned: some CO2 lasers like Glowforges don’t have enough Z-height for rotary engraving. I recommend the P2 below instead, which has a riser base attachment however so you can engrave up to 8.5” tall objects, more than enough for even the tallest projects!
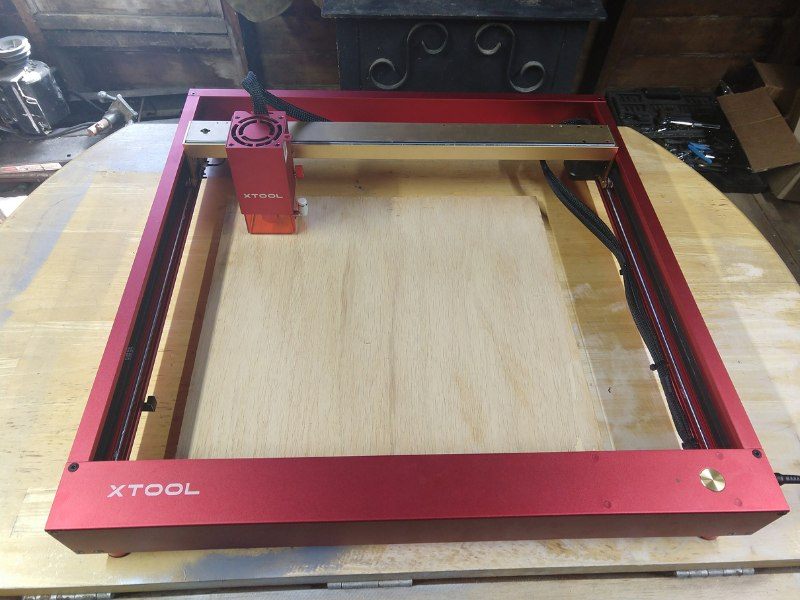
3. xTool P2 – Best CO2 Laser Engraver For Tumblers
- Price: Check price at xTool here
- Rotary: RA2 rotary available for $279
- Working area: 600 x 308 mm
- Laser type: CO2
- Power: 55W
The xTool P2 is the best CO2 laser for tumblers in its price range. You’ll need the RA2 rotary attachment, and the riser base attachment which gives you 8.5” maximum height for rotary engraving.
As a 55W CO2 laser, it’s faster to engrave (and also means you can laser cut 20mm thick wood and acrylic in a single pass).
It’s also ideal for tumblers, and any glass, wood or metal cylindrical projects you plan to engrave. Diode lasers just aren’t as effective as CO2 lasers, so this is a big upgrade.
The rotary is easy to use with XCS software, and the riser base is also easy to assemble and use. I assembled the rotary in under 15 minutes, and the riser base took around half an hour.
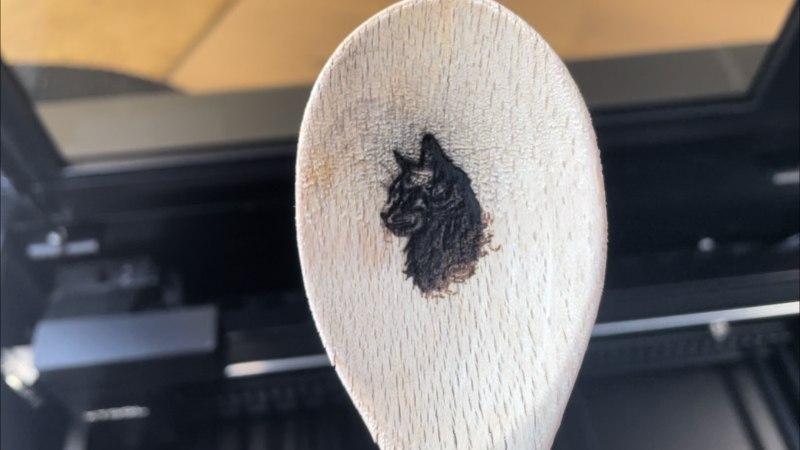
There are also batch processing tools that’ll save you time if you’re a small business, and curved surface engraving features for engraving on uneven surfaces without distorting your design.
Here’s a curved wooden spoon I engraved using my xTool’s curved surface features:
Here’s a quick video I made on how the batch processing works:
Overall, I think it’s the best desktop CO2 laser right now, and a fantastic option for engraving tumblers, mugs and other cylindrical objects.
Simple the best CO2 desktop laser right now. You can buy this, the rotary, riser base, and the automatic conveyor feeder, and it's still cheaper than a Glowforge Pro.
It's more powerful than competing lasers at 55W, can cut 20mm thick wood in a single pass, and the batch processing and curved surface engraving open up new possibilities for your business.
- Large processing area
- Powerful 55W laser cuts 20mm thick material in a single pass
- 16MP dual cameras autofocus for easy project preparation
- Curved surface engraving in XCS
- Batch processing features
- Can't use all features in Lightburn (but XCS software is really good now)
- Mirrors/lenses may be out of focus from transport and require fixing
Fiber Lasers
Fiber lasers are more powerful and precise than diode and CO2 lasers, and produce the best results on tumblers. However, they’re also the most expensive and have the smallest working areas.
They have 1064nm wavelengths, which is far more suitable for engraving steel tumblers, flasks, Yeti cups, and even rare copper tumblers.
Fiber lasers can also anneal steel tumblers. This is when the fiber laser makes a permanent mark on the steel without engraving it, while preserving stainless steel’s anti-corrosive properties.
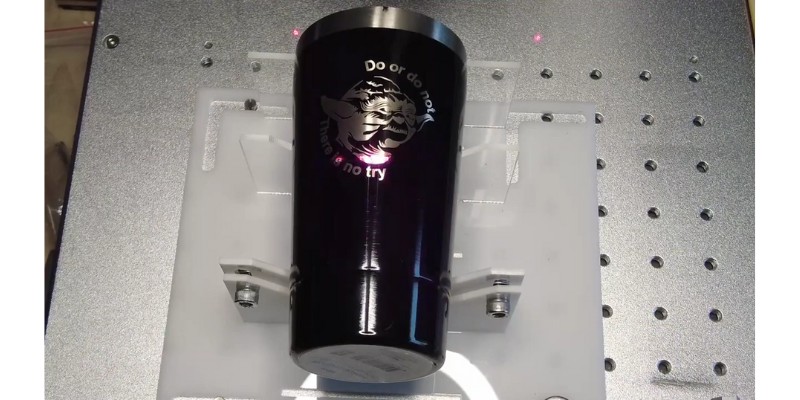
4. Cloudray QS-30 LiteMarker – Best Fiber Laser For Tumblers
- Price: Available on Amazon here
- Speed: 500mm/s

The QS-30 comes with a Cloudray D80 rotary module included. This is a very impressive three-jaw chuck rotary that offers great stability, smooth and accurate rotation, low noise, and low friction. Cloudray also offers a variety of other chuck and roller rotaries that you can choose from.
If you’re laser engraving tumblers as part of a larger operation, the Cloudray QS-30 LiteMarker is a professional solution.
Not only that, but fiber lasers deliver unparalleled speed – the 5000mm/s max engraving speed of the QS-30 LiteMaker simply blows the other lasers we’ve reviewed out of the water.
Another benefit is durability. While the LaserPecker 2 Pro and other diode lasers typically last for around 10,000 hours, this laser offers 10x that with a 100,000-hour lifespan, a more reliable investment for businesses.
How to Pick a Laser for Tumbler Engraving
Rotary
You’ll need a rotary add-on to engrave tumblers or anything cylindrical. These are the important things to check before buying your laser for tumbler engraving:
- Rotary price and quality
- Maximum tumbler diameter allowable inside the laser
- Ease of using the rotary
- Rotary type (chuck, roller, multi-function)
Also, check the laser’s work area to know the size of beakers and tumblers it can engrave.
There are two types of widely used rotaries: chuck and roller. The image below shows these rotary types.
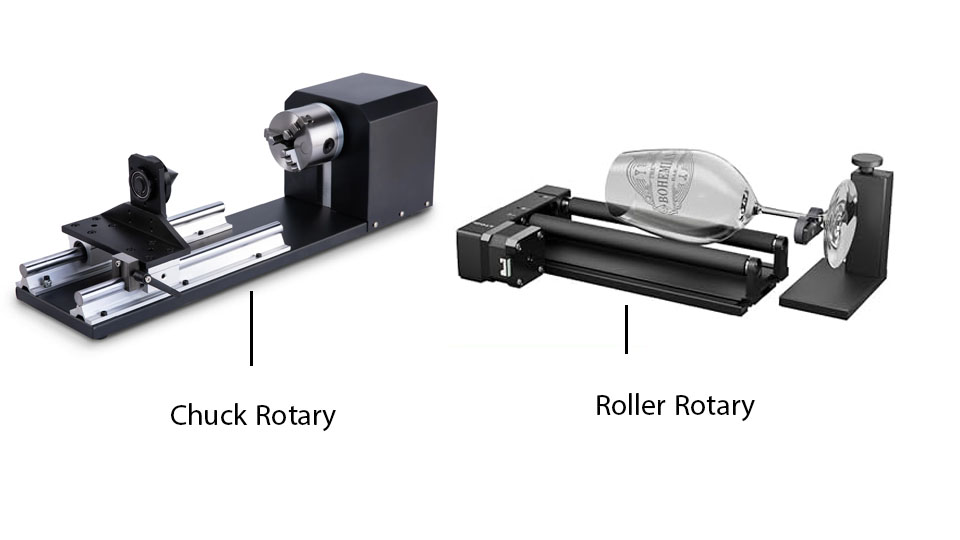
Chuck rotaries are more precise since roller rotaries may slip. However, roller rotaries can accommodate larger diameters, and are easier to setup.
The table below shows which rotary type is compatible with various tumbler shapes:
| Tumbler Shape | Example Picture | Chuck Rotary | Roller Rotary |
|---|---|---|---|
| Cylindrical |  | Yes | Yes |
| Conic |  | Yes | No without level adjust,Mediocre results even with level adjustment equipment: tumbler very likely to slip or even fall off. |
| Has handle but not engraving on handle side |  | Yes | Yes |
| Has handle and engraving 360° |  | Yes, only if the handle is small enough not to hit the chuck rotary base. | Yes, only with roller rotaries with wheels for ends and an empty middle space design |
Speed
You don’t need much power to engrave, but the engraving speed affects your productivity. Small lasers with Galvo technology are generally faster at engraving, but they’re limited in the size of tumblers they can handle.
How to Laser Engrave a Tumbler?
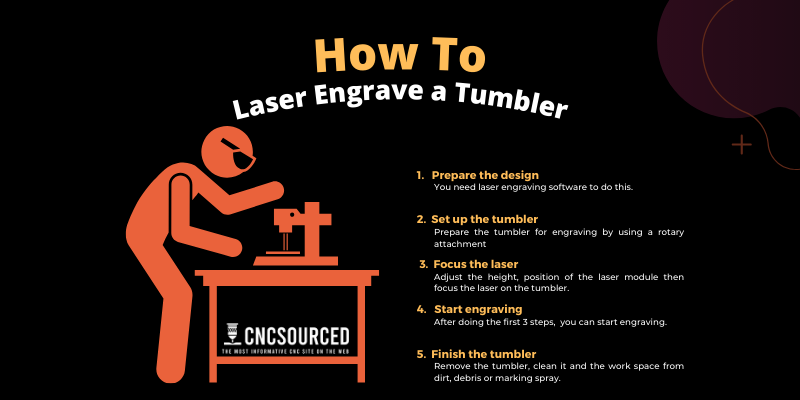
1. Prepare the design and your laser settings
The first step to laser engraving a tumbler is to create your design.
You can create the design in vector software like Inkscape or Adobe Illustrator, or for basic designs, you can create these within the Lightburn control software.
Both Lightburn and LaserGRBL software have rotary features for engraving curved surfaces.
2. Set up the tumbler
Once you have your design ready, get your tumbler ready for engraving.
To do this, you need a laser with a rotary attachment. Some lasers come with rotary attachments included, although many brands sell them as separate accessories. The rotary attachment securely holds the tumbler in place while rotating it in the desired direction so the laser can engrave all sides.
We also have an in-depth article on every specific Lightburn setting to optimize for perfect tumbler engraving, which also gives a secret method to make sure you never get mirrored designs, so you don’t even have to do a test engraving!
3. Focus the laser
First, adjust the height and position of the laser module if necessary, and then focus your laser according to the material you’re engraving, and the result you want.
4. Start engraving
Once the above steps are done, you can begin engraving. Depending on your laser and setup, you can do this using a controller, a control panel on the machine, or through your software or mobile app.
5. Finish the tumbler
Now you can remove the tumbler, clear away any dust or debris, and make any finishing touches. If you used a marking spray at all, you can wipe this away with a cloth and water.
Tips for Best Results:
Here’s a quick checklist to get the best results from your tumbler laser engraving:
- Proof your design first to ensure proper spelling, spacing, etc.
- Clean the tumbler surface before engraving.
- Apply painter’s tape to areas you don’t want engraved.
- Use simple fonts and designs, and avoid tiny details.
- Use low engraving speeds and multiple passes for deeper etching on metals.
- Allow time for gases and fumes to dissipate before removing the tumbler from the engraver.
- Hand wash the tumbler gently to keep the engraved design looking its best. Avoid using the dishwasher.
FAQs
Are laser-engraved tumblers dishwasher safe?
If the tumbler you’ve engraved is dishwasher safe, laser engraving won’t affect this. If you’re buying a pre-engraved tumbler, the description usually states whether it’s dishwasher safe.
Can you laser engrave a tumbler without a rotary?
You can’t engrave around the tumbler, but you can engrave on a small area on the side facing the laser beam.
The larger the diameter of the tumbler (reducing the angle per mm), and the smaller your design is, the more you’ll stay near the focal point and the less your design will warp, and teh better your results will be. Some Redditors also recommend other ways to do this.
For example, writing one small-sized letter (say “S”) on a large-diameter mug or tumbler is possible without a rotary.
However, larger engravings, or the same-sized engraving on a smaller diameter mug, will warp more and will generally come out badly.
So, if you can afford a rotary (the Ortur ones start at under $100), you should just buy one of these instead.
What laser settings are best for engraving yeti cups?
It depends on whether the Yeti cup is powder-coated or uncoated stainless steel, as well as the manufacturer of the laser.
Generally though, for a powder-coated Yeti cup, a 45W CO2 laser at 50% power and 220mm/s should give good results.
How durable is laser engraving on tumblers? Does it fade or wear off over time?
Laser engraving creates a permanent mark on tumblers, which should not fade or wear off even with regular use and washing. As long as you follow care instructions to avoid abrasive cleaners, the engraving should last the lifetime of the tumbler.
How long does it take to engrave a typical stainless steel tumbler?
It depends on the laser type, speed, and design area. Fiber lasers and IR lasers with Galvo technology can engrave stainless steel tumblers very quickly, usually in under a minute for a regular design. However, if you’re engraving with a diode or CO2 laser, you’ll have to prepare the surface and wait several minutes for the engraving.