We previously tested the 3D printer toolhead of the Snapmaker 2.0, and found it to be the best 3-in-1 3D printer on the market.
Today, we’re going deep into the laser cutter and CNC carving capabilities of this multitalented device to see if it stacks up to its standalone competitors (hint: it does)/
I’ll share my first-hand experience across all the key aspects – evaluating the pros and cons of performance, setup, tool head flexibility, connectivity options – even noise level.
If there’s anything you need to know, you’ll find it here.
We also tested the Snapmaker 2.0 4-axis rotary module, which turns the laser engraver or CNC toolhead into a 4-axis lathe, so you can carve cylindrical or other shaped models, such as chess pieces, or engrave 360-degree blocks of material like gift boxes.
Here’s our full review:
Snapmaker 2.0 – CNC & Laser Toolheads Test
Setting up the Snapmaker to laser cut, engrave and CNC
We cover the full assembly process in our Snapmaker 2.0 3D printer review, and from unboxing to being ready to print, the Snapmaker 2.0 takes 60-80 minutes.
It was a noticeably seamless and pleasant experience – you could feel the hours of careful design and experience planning that went into every tool, screw, and part of the Snapmaker 2.0
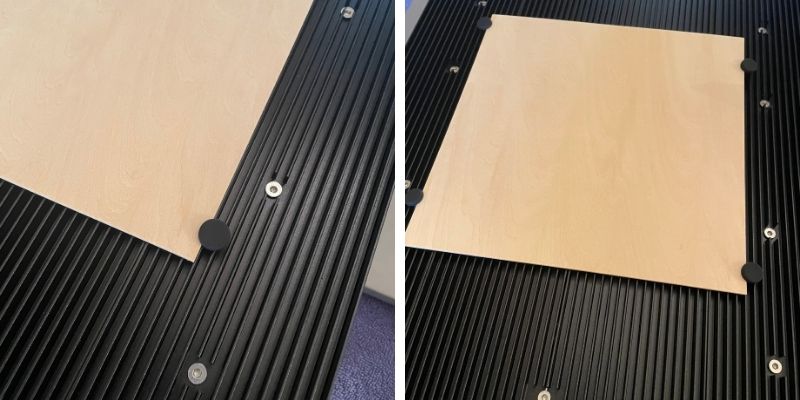
This includes around 5-10 minutes attaching the 3D printer toolhead, the filament holder and spool, and the heated bed — and attaching the laser or CNC head instead, along with their respective build plates, takes a similar time.
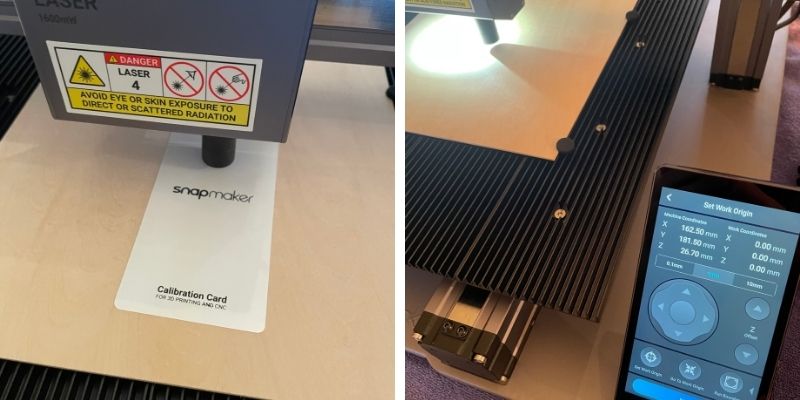
Once you’ve installed everything, calibrating the Snapmaker 2.0 laser engraver or CNC toolhead is simple. Each has a different calibration process, with the laser offering camera calibration, and a slightly more complex calibration process for the 4-axis CNC module.
Snapmaker 2.0 Key Specs
Price: $1,199 to $1,799 — Available at Snapmaker Official Store here
Build volume: A150: 160x160x145mm, A250: 230x250x235mm, A350: 320x350x330mm
Available toolheads: 3D printer, laser cutter and engraver, CNC carver, 4-axis rotary module (extra), 10W powerful laser (extra)
Snapmaker 2.0 A350 Laser Cutter Test
While the Snapmaker 2.0 3-in-1 is sold as both a laser cutter and laser engraver, in reality, the laser is not strong enough to cut through anything too thick or hard. It’s more of a light cutter for thin softwoods, while anything more serious would need a formal laser cutter like a CO2 laser.
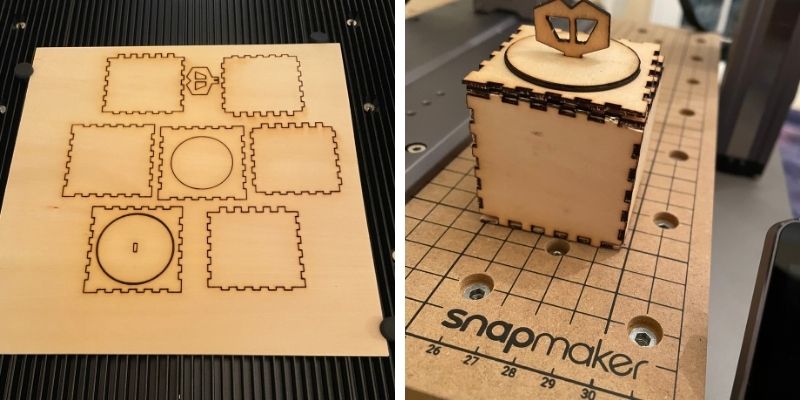
That being said, the Snapmaker 2.0 laser cutter comes with two thin ~1.5mm sheets of soft wood, which is used in their video tutorial for the calibration process, as well as for an example project where you cut out the pieces of a wooden box.
That seemed a good project to test out the Snapmaker 2.0’s laser cutter, so we opened that project up in Snapmaker Luban, exported the G-code, and sent it over to the Snapmaker via WiFi (you can do this via USB as well, and a USB stick comes with the Snapmaker 2.0).
For this example project, Snapmaker created their own custom settings which we also used (you can use the same default settings in Snapmaker Luban). We set the homing point for the material, and started cutting. The estimated time was roughly 48 minutes for the project, but the final project ended up taking 37 minutes to finish.
The camera calibration setup worked perfectly, and there was no zig-zagging or any inaccuracies when passing the laser over the same point — as can happen if the laser isn’t set up properly. The cuts were very accurate, and the final wooden box looked good when assembled.
We have also since tested the 10W High-Power Laser for the Snapmaker 2.0.
Snapmaker 2.0 Rotary Module – 4-axis Laser Engraving
If you pay an extra $649 you can pick up Snapmaker’s 4-axis rotary module add-on, which effectively turns your CNC and laser modules into a 360-degree turning lathe. This opens up possibilities for engraving text or artwork onto cylindrical gift boxes, or carving designs such as chess pieces out of material blocks with the CNC toolhead.
We first tried the Snapmaker 4-axis rotary module with the laser engraver. Rather than use the laser print bed, you use the CNC bed and attach the rotary module on top.
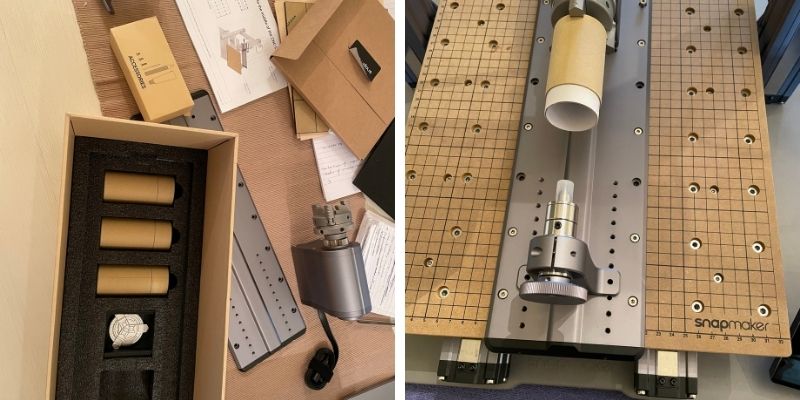
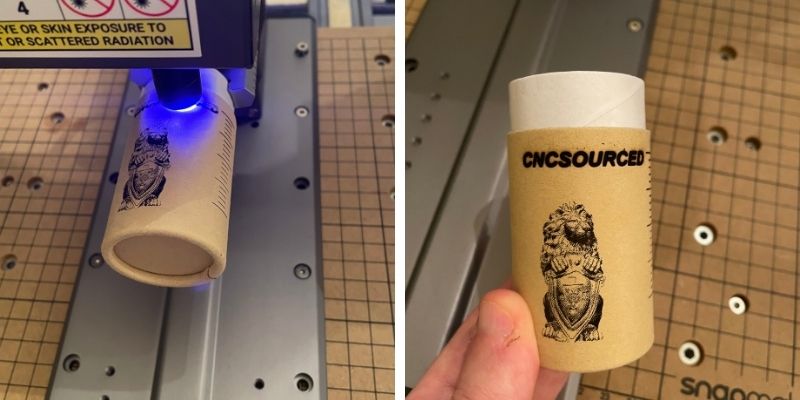
Snapmaker Luban software has built-in support for the 4th axis Snapmaker attachment, as well as a pre-set example project for engraving a lion design, and they also supply you with 3 cylinder card gift boxes to start you off with.
Calibrating the laser engraver to work with the Snapmaker 4-axis rotary laser attachment was surprisingly simple. You manually calibrate the home area to the end of your workpiece, input its length and width values, and the Snapmaker then engraves a series of lines on the material for you to pick the thinnest line, as it does with standard laser engraving.
You then open and close the jaws of the rotary attachment to safely and securely hold your material block in place. If you’re using wood or another heavier material you may need the tailstock to keep the workpiece in place, but the paper containers are so light that it wasn’t required.
Then, load the design up in Snapmaker Luban and re-size it to fit the material block you’re engraving on. The paper cylinder Snapmaker supplies measures 75 x 40 mm, so we resized the lion design to fit comfortably within this, but the Snapmaker 2.0 has an option to show you the work dimensions before you start engraving so you can be sure you’re engraving within your material’s dimensions.
We could have made the design larger, but for the first engraving, we played it safe. The smaller design did however give us an opportunity to study how well it could engrave very precise details, such as darker areas of the lion model to show depth and contrast throughout the design.
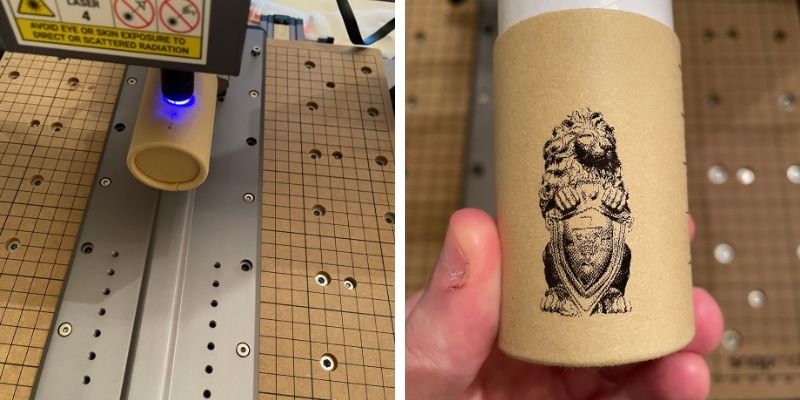
The results were very impressive. The small design’s tones effectively showed depth and for any similar-sized engraving you might want to create on products to sell, such as your brand or a custom design, the Snapmaker with the 4-axis rotary attachment and laser engraving toolhead are well suited.
The engraving took around 35 minutes, so if you’re selling custom designs of around this size and using the same quality and general settings, factor around this time for engraving.
That was a Snapmaker supplied design, so we tried adding some text above it, as you would if you ran a small business and wanted to engrave text on products, or your brand name. While you may create the DXF, TIFF, JPG or similar file for your text, we wanted to try Snapmaker Luban’s in-program design toolset, so we tried to create our CNCSourced brand logo within Luban for laser engraving.
The process was easy: simply select the text tool (there are also tools for drawing custom-sized circles/ovals and rectangles/squares), and enter your chosen text or design dimensions.
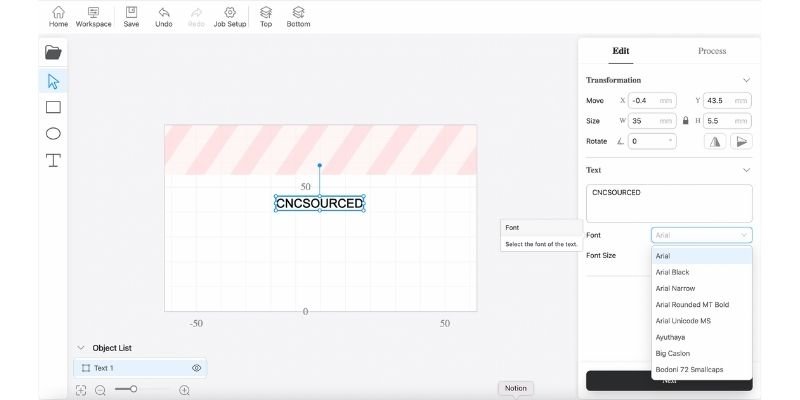
We resized the text to fit above the existing lion engraving and made the font small enough to fit on the 40mm diameter gift box, and exported it to engrave.
As it was a simple and small design, it took just 4 minutes to engrave, and looked great – perhaps the only thing we’d change would be to use a lower laser strength percentage (we used 60%, down from the original 100% setting) as the letters were very charcoal black, and the engraving was perhaps slightly deeper set into the material than it needed to be.
Nevertheless, nitpicking aside the results were great – and if you choose to you can add extras onto pre-made designs in the same way.
4 axis rotary module: $649 — Available at Snapmaker store here / Amazon here
Snapmaker 2.0 4-axis CNC carving
If you purchase the Snapmaker 2.0 4-axis rotary module, you’ll find it comes with three cylinder-shaped gift boxes – the ones we used to engrave on. Inside these cylinders are three cylindrical epoxy tooling board material blocks measuring 70mm long and 35mm in diameter.
If you’re using a Snapmaker A250 then you’re in luck, because 70mm is the exact maximum length you can use the tailstock with, and Snapmaker A350 users will have no issue (A350 maximum tailstock length is 170mm).
These blocks were ideal for testing out whether the Snapmaker really could handle 4-axis CNC carving, and Snapmaker Luban comes with two presets for 4-axis CNC projects: a lion; and a knight chess piece.
Setting up the 4-axis rotary module was easy, but the calibration is more complex with the CNC than laser engraver.
You need to precisely identify the X1 and X2 points (the edges of the left and right side of your material block’s diameter), the Y, Z, and B (if the project is slanted) to accurately find the work origin and work boundary.
This must not be rushed, unless you want a not-quite-right finished model, and is worth taking 2-4 minutes to accurately set using the calibration card that comes with the Snapmaker.
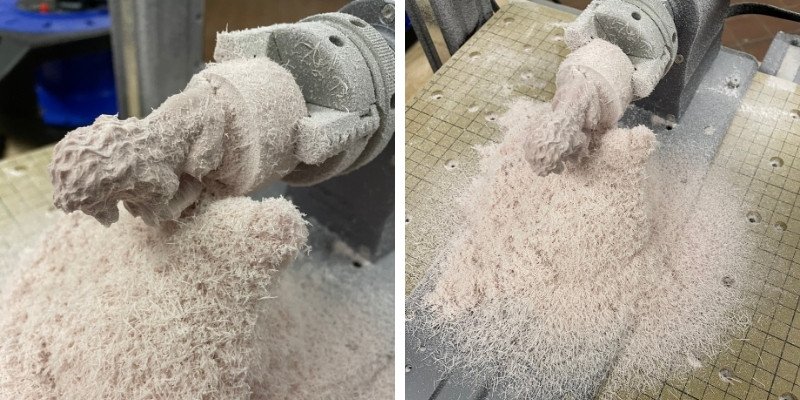
Naturally, the CNC carver is very loud when it starts on your project. The first time we used it, we set it to carve out the knight chess piece based on the software’s estimated total work time at 7 hours and 17 minutes, and the noise was loud enough that if you used it in your house or flat’s main room, you would be able to hear it loud and clear from anywhere else – even from a different room.
This, coupled with the material remnants that collect around (you can vacuum them, but still dust may spill onto nearby things – unless you use the Snapmaker 2.0 enclosure), makes it difficult to use if you don’t have a workshop or otherwise separate area especially for making, as the noise will make it difficult to concentrate on any work or similar project nearby. However, for small businesses this is fine, or if you’re a homemaker with a separate location, workshop or garage to work in.
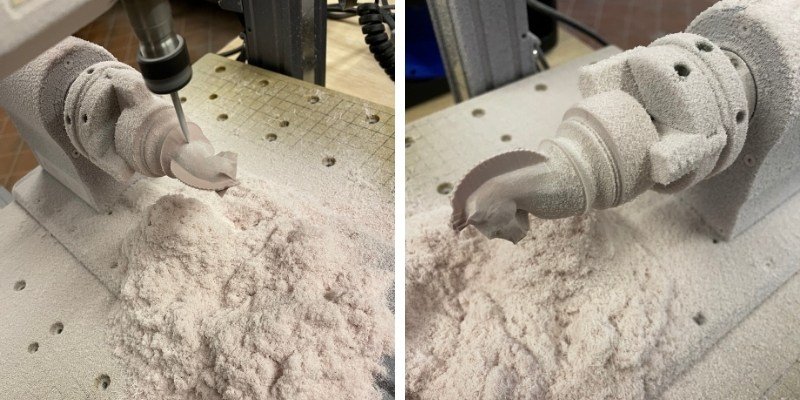
The first 4-axis rotary module piece took around 7 hours using Snapmaker Luban’s default settings.
The first, rougher cut took around 2.5 hours, before the v-bit passed over the model for a second time, smoothing out rougher edges and giving the piece an overall better surface finish.
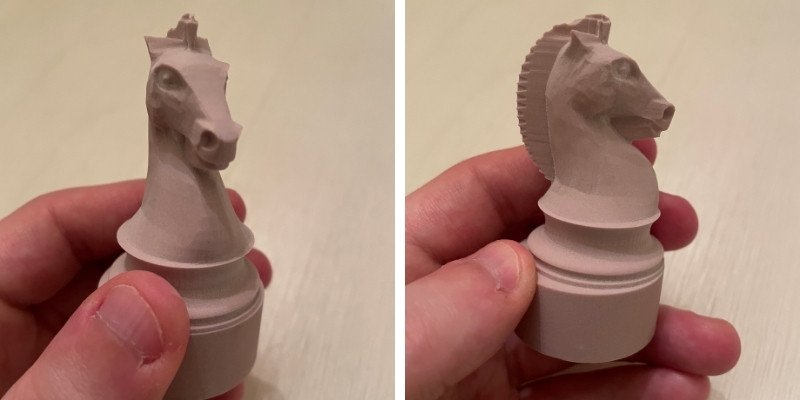
The final model looked fantastic, and really was a positive surprise given that the Snapmaker 2.0 CNC carver isn’t its only function – as a 3-in-1 machine, naturally you’d expect to lose some quality in each function. The knight was smooth all around, and even fine details like the divots in the horse’s eyes appear crisp.
One thing to note, however, especially if you don’t plan to use the tailstock, is that you must clamp the material block as tightly as you possibly can. The first part of the carving is the most force-inducing since the bit is carving thicker layers of the material. The first time we tried to carve the model, the epoxy block fell out of the chuck after around 2 minutes, so we tried again, taking extra care to clamp the model more tightly. It worked from then on out, but don’t be afraid to clamp the chuck around the model so tightly that some minor marks are made on the base – especially if you don’t use the tailstock.
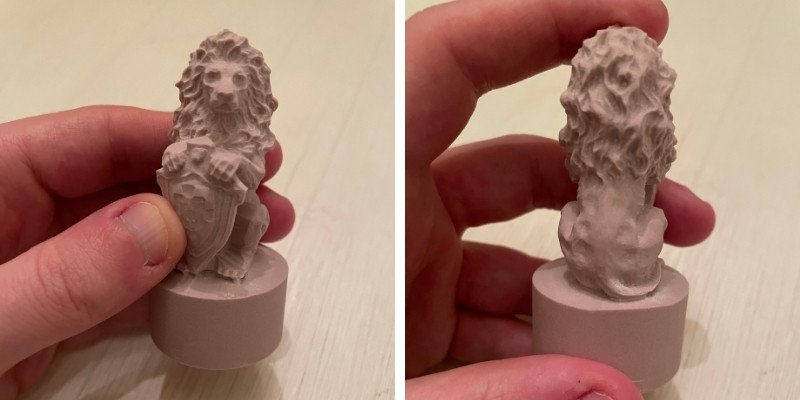
We then tried the 4-axis CNC carver of the Snapmaker 2.0 A350 with another model, this one more complex and with more precise edges and details to test the machine’s adaptability and precision. This was a lion model, with precise details on the lion’s mane, paws, shield, feet, and ribcage.
This model was estimated to take 3 hours and 20 minutes, notably shorter than the knight chess piece. And in the end, it took around this time – Snapmaker Luban’s estimates are generally accurate for Snapmaker CNC carving. We tested the USB connectivity on the Snapmaker for this model, rather than using the WiFi as we had been doing, and it worked with no problem, both for exporting the G-code onto a removable disk, and having that same USB show up in the Snapmaker 2.0 to carve the CNC file.
Again, the Snapmaker 2.0 CNC toolhead impressed. The lion’s mane is sharp to the touch it is so precise, and complex detailing on the hands, feet, nose, and eyes look very realistic. The quality was better than we expected, given that it is a 3-in-1 CNC router.
Though you should tweak the settings to what works for you, generally expect that for these sized 70x35mm pieces to be able to carve 1, or maybe 2, of these per day. So, if you’re planning on carving an entire custom chess set, it’ll take a while. Also, keep these expectations in mind if you plan to make money with your Snapmaker 2.0, as you need to factor time into the price you plan to charge for your custom wares.
Snapmaker 2.0 CNC and Laser Pros
Snapmaker Luban software
Snapmaker Luban handles all 3 uses — 3D printing, laser, and CNC projects — including the 4 axis rotary module. So you only need to learn one software (and it’s very simple to use) and don’t need to switch between them. The 3D printing part is similar to Cura and feels intuitive, and the CNC and laser engraving and cutting parts are easy to grasp. Even the 4-axis CNC and laser software are made simple with clearly marked boundaries where the router bit will work so you can keep your designs within the boundary.
Easy to switch between toolheads
All you need to do is unscrew the four 4×8 screws for the toolhead and unplug the socket, and then unscrew the bed for the new bed, such as the wooden bed for CNC, or the laser bed. Switching modules takes around 5 minutes in total, and then you’re ready to go almost instantly from switching the machine back on.
WiFi connectivity makes your workflow much simpler
Cheaper laser engravers such as the Ortur Laser Master 2 Pro don’t have these features, and when we tested it, it was generally a clunkier process to engrave as you needed to keep connecting it to your laptop or PC. WiFi keeps things fast and remote, though the USB works fine also as we tested this for our 4-axis CNC test.
The Snapmaker’s laser camera makes for easier calibration
It takes 9 pictures of the laser bed, identifying the material’s dimensions and adjusting to those dimensions. You can also manually calibrate the laser using the Snapmaker calibration card and moving the laser point to near the material’s height.
Variety of useful carving bits
For CNC carving, you get a standard ER-11 collet and a variety of different carving bits. For example, the 4-axis rotary module comes with a Straight Groove V-bit that accurately carved the two epoxy models we showed above. There are also other bits that come with the standard Snapmaker 2.0.
Cons
Noisy
While the laser isn’t too overpowering, the CNC toolhead, as expected, is very loud, and requires a workshop or similar to keep the noise out. We used the Snapmaker in a workshop around 15 meters away from any recreational space, and if you opened the door you could still hear a faint whirring sound.
The 3D printer, while still fairly noisy, is not as loud as the CNC toolhead, but would still be heard throughout the floor of a house or flat, and you should still house it in an external workshop or office if possible.
Tailstock CNC workflow
The adding tailstock workflow could be made simpler. It’s easy to click through this part and have the CNC carver start working before installing the tailstock – which is important especially with heavier material blocks like metal.
Attaching the tailstock is also the next step after calibrating, and the last step before starting a project. You need to be careful to not set your work start point to cut through the tailstock’s sharp point, as reviewers online have pointed out.
While we never had this issue, we saw this mentioned online and feel it is worth mentioning — though the fact it can cut through the tough metal tailstock is impressive in itself.
So should you buy the Snapmaker 2.0?
We are very big fans of the Snapmaker 2.0, and having tried all its functions, including the rotary module add-on, we’re continually impressed by how effective it is at every single function.
None feel like a rushed inclusion, each function feels like you’re using a machine specially designed with this use in mind.
| Offers precision cutting and engraving with high standards in both aesthetics and function. | The machine is noisy, particularly when using the CNC toolhead. |
| Comes with a variety of useful carving bits for CNC carving. | The workflow for adding the tailstock could be made simpler. |
| Toolheads are easy to switch, taking about 5 minutes total. | |
| Laser camera simplifies calibration by identifying material dimensions. |
We didn’t try Snapmaker’s new 10W high power laser module, which is another option for more effective laser cutting, but that would further boost your making potential.
We did use the Snapmaker enclosure, however, an optional add-on that helps filter fumes away from the laser, and keeps the dust and chips from your CNC carving in. It also makes for better ABS 3D printing as the enclosure helps regulate the temperature, preventing any warping from the filament cooling too quickly after being melted. It’s definitely worth investing in overall. If you want to see some other snapmaker models, check out our article
Check out another modular CNC machine, the Stepcraft CNC D840.