Key Takeaways
- I J K method: Use the relative coordinates of the circle’s center from the starting point to specify the circle. For example,
G02 X8 Y0 I3 J4 K0. - R method: Use the radius of the circle to specify the circle. For example,
G02 X5 Y5 R5. Choose the sign of R based on the length of the arc. Use -R for longer arcs and R for shorter arcs. - Full circle: Use the I J K method to create a full circle by giving the same coordinate as the starting point and endpoint. For example,
G02 X0 Y0 I5 J0 K0. Or use the R method to create two consecutive arcs. For example,G02 X10 Y0 R5andG02 X0 Y0 R5. - Plane selection: Use G17, G18, and G19 to choose the XY, XZ, and YZ planes respectively. For example,
G17 G02 X5 Y5 R5.
If you are interested in CNC programming, one of the main steps in learning G codes is to learn circular interpolation with G02 and G03.
Circular interpolation is a fancy way of referring to programming a circular arc with G code.
For this, you need to learn some easy math that allows you to specify any arc with two different methods: with I J K, or using R.
Most people find using R easier at first glance, but then end up in confusing situations. That is because many of the online sources I have come across have failed to clearly point out the different thought processes of the I J K method and the R method.
Instead, some of them recommend just going with I J K to avoid mistakes. This is sweeping the issue under the rug.
Actually, I J K is easier to understand geometrically but often more complicated to calculate in practice.
On the other hand, learning how to specify a circle with R is a little harder to understand. But once you gain the right attitude, it is easier to use most of the time.
These points will be evident when we solve a couple of examples with both methods.
- Key Takeaways
- Do You Need to Learn G02 and G03?
- CNC Circular Interpolation (Arc) with G02 and G03 Using I J K
- R Method in G02 and G03 G Codes
- A G02 Example Solved with I J K and R
- Half Circles with G02 and G03 Using R
- G Codes for Full Circle with G02 and G03 Using I J K
- G Codes for Full Circle with G02 and G03 Using R
Do You Need to Learn G02 and G03?
To be clear, you don’t need to know CNC programming to work with your CNC machine; since your CAM software takes care of G codes for you.
But there are a lot of merits to learning CNC programming. Here are some of them.
- It allows you to skip CAD and directly go for G Codes in simple designs.
- It makes custom movements possible for collision avoidance.
- You can troubleshoot miscommunications between the controller and your CAM software.
Now, to learn CNC programming, you need to learn to set feed rates with F, linear movement with G0 and G01, and circular interpolation with G02 and G03.
Read on to learn circular interpolation
CNC Circular Interpolation (Arc) with G02 and G03 Using I J K
So you want to create an arc of a circle with a known radius.
And your CNC machine is at the starting point.
You also need to tell your controller the endpoint, the circle’s center, and whether to go clockwise or counterclockwise.
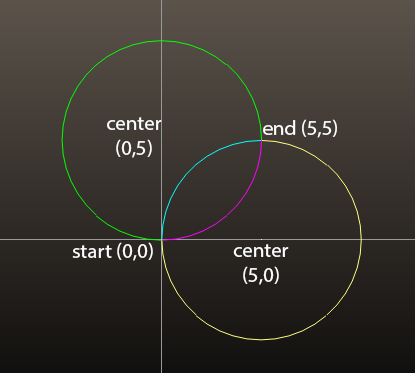
Consider the image below that shows a circle of radius 5.

Starting point: it is your machine’s position before producing the arc. Here, the starting point is at (0,0).
Endpoint: in this example, we move on the circle until we reach the endpoint (5,5).
Direction: it tells your controller whether you want the blue arc or the yellow arc in the image above.
If we walk clockwise, we go on the short blue path to get to the endpoint. But if we move counterclockwise, we go round the long yellow arc.
Command G02 makes your controller move clockwise (on the blue arc) while G03 makes it go counterclockwise (on the yellow arc).
Center: it is absolutely crucial to tell your controller the location of the center of the circle you have in mind.
The center’s location specifies the circle, and this is where I, J, and K come in.
They respectively indicate the position of the center relative to the starting point along X, Y, and Z.
So in our example, we need to move 5 units along X, 0 units along Y, and 0 units along the Z-axis from the starting point. So, we get I5 J0 K0.
Here are the two commands we can use in our example.
For the blue arc, we have G02 X5 Y5 I5 J0 K0.
It means: go clockwise (G2) to the point (x=5, y=5) on a circle whose center is 5 units to the right (I5 J0 K0).
For the yellow arc, we put G03 X5 Y5 I5 J0 K0.
It means: go counterclockwise to the point (x=5, y=5) on a circle whose center is 5 units to the right (I5 J0 K0).
Considerations When Using I J K with G02 and G03 G Codes
- Note that the I J K uses a relative coordinate from the starting point, not the absolute coordinates of your circle’s center. Some controllers may have a command for specifying the absolute coordinate of the center as well.
- In our example, we had a 90° arc in the XY plane. Calculating I J K can take time in more complicated situations such as when the arc is not a multiple of 90°. In these situations, it is far easier to use the R method.
R Method in G02 and G03 G Codes
Alternatively, you can give your controller the radius of the circle instead of its center. This way, you do not need to calculate I, J, and K.
Also, in this method, you specify the plane first. G17, G18, and G19 respectively choose the XY, XZ, and YZ planes.
For our example above, you can use this command to get the blue arc:
G17 (choose the XY plane.)
G02 X5 Y5 R5.
It means: go clockwise to the point (x=5, y=5) on a circle whose radius is 5.
It seems much easier, right? There is no need to calculate I, J, and K. Just say the radius and that’s it.
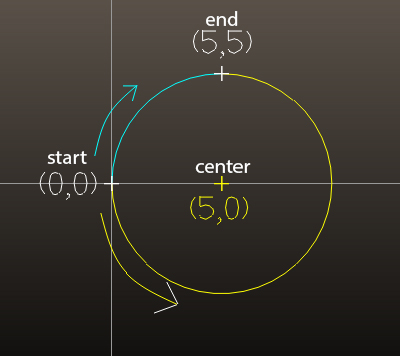
The problem is, if you use G03 instead of G02, you don’t get the yellow arc, like before. You get something else entirely (you get the purple arc in the image further down).
This baffles a lot of people and they end up saying it is just better to endure the hardships of the I J K method instead of R.
But don’t worry. We explain it clearly here, and if you learn it, you can use as much R as you please instead of I J K.
As a rule of thumb, when you want to go on the longer arc in the R method, you need to use -R instead.
That’s it. So in our example, you need to use the command G03 X5 Y5 R-5 to trace the yellow arc.
We explain the reason behind this rule of thumb in the following paragraphs.
Full Understanding of G02 and G03 with the R Method
Fact: there are actually two different circles with the same radius that go through your starting point and endpoint (in your plane). You can see the other circle in the image below. Its center is at (0, 5) instead.
For comparison, you don’t have this issue with I J K. Because specifying the center for your controller narrows it down to only one circle and two arcs.
But if you only give the radius R (and the plane), your controller has to choose between two circles and the 4 arcs in the image.
Note that each circle has one clockwise and one counterclockwise arc. One of them is shorter and the other is longer.
So, to solve this problem, after deciding between G02 and G03, all you need to do is choose the sign of R based on whether you intend the longer arc or the shorter one.
As a convention, to go on the longer arc we use -R, and to go on the shorter arc we use R.
Here are the commands for each of the four arcs in the image above:
- Blue arc: G02 X5 Y5 R5
- Yellow arc: G03 X5 Y5 R-5
- Purple arc: G03 X5 Y5 R5
- Green arc: G02 X5 Y5 R-5
A G02 Example Solved with I J K and R
After this example, it will be obvious that if you have learned the R method, it pays off since it is usually much easier to use.
In this example, we want to give commands to craft the arc in the image. The circle’s radius is 5 and our starting position is at (2, 0) in the XY plane.

Solving with I J K
Since we are in the XY plane, we have K=0.
To calculate I, we note that the X coordinate of the center is halfway between the starting and endpoints. So we have I= (8-2)/2 = 4.
We calculate J from the right triangle below.

Using the Pythagorean theorem we get J=4.
So, the correct command is G02 X8 Y0 I3 J4 K0.
Solving with R
To do this with the R method, we consider a clockwise movement (G02). And since we are on the longer arc we use -R:
G17
G02 X8 Y0 R-5
As you can see there are very few calculations in the R method. Just remember that longer is – and shorter is +.
Half Circles with G02 and G03 Using R
It doesn’t matter which sign you use for R in creating half circles, since the two aforementioned circles coincide in this case.
G Codes for Full Circle with G02 and G03 Using I J K
To produce a full circle with the I J K method, give the same coordinate as the starting point and endpoint.
Let’s say we want to create the full circle of our first example. Here is the image again.
Here is the command to produce the circle: G02 X0 Y0 I5 J0 K0
G Codes for Full Circle with G02 and G03 Using R
Note that there are infinitely many circles with a given radius containing a given point.
So, unlike the I J K method, you can’t craft a circle with R when the starting point and the endpoint coincide.
This is why many people say that you must use the I J K method to create a full circle. And that the R method is only good for arcs of up to 359°.
But here is a solution for producing a full circle with the R method.
Find another point on the circle to break the circle into two arcs. Then create those arcs consecutively.
So, for our example, we can use the point (10, 0) with these commands:
- G17
- G2 X10 Y0 R5 (Go clockwise to the point (10, 0) on a circle whose radius is 5.)
- G2 X0 Y0 R5 (Continue on the circle back to the starting point.)
To sum up, G02 and G03 are used for circular interpolation. G02 crafts clockwise arcs while G03 creates counterclockwise ones.
To create an arc of a circle, you need to specify the arc and the circle. For the arc, we state the endpoint and use the CNC machine’s current position as the starting point.
For the circle, we can use two methods with G02 and G03.
In the I J K method, we identify the circle by specifying its center’s relative coordinates from the starting point.
In the R method, subsequent to declaring the plane, we just give the radius R. We need to use the correct direction with G02 and G03 along with the correct sign of R.
We prefer the R method because it requires much fewer calculations. But since this method produces two circles, you need to learn the correct combination of G02, G03, R, and -R to generate the appropriate command.
Other articles you may be interested in:
- Stepover in CNC CAM
- The best CNC software (including CNC control software)
- The best CNC routers
- 5 things that affect CNC accuracy
- The best sites for DXF CNC files
- Best CAD-CAM software