The key to transforming your CNC hobby into a lucrative enterprise is by using ideas that actually sell – and I’m here to show you exactly how
This guide will step you through the most profitable CNC projects that buyers can’t resist, carefully selected to help you stand out in a flooded marketplace.
Most consumers are looking for unique, homemade things to liven up the mundane – all of my recommendations achieve that, and will help you turn your CNC router into a money-making machine.
We’re focusing on areas with the highest market demand: home decor, practical models, furniture, pet accessories, and toys.
Why these niches? Because they’re timeless, broad enough to cater to a variety of customer tastes, and you can charge a decent amount per item.
User-friendly sites like Etsy and Facebook Marketplace make it very easy to sell as a CNC business. There’s really no reason why you couldn’t take one of my ideas, add a few more related items, and be making decent money within a month.
CNC Home Decor
Home decor is special for many people. Expressing yourself by personalizing your living space is a great way to turn a house into a home. Because of this, a lot of homeowners have taken to using personalized, custom furnishings and decorations to make sure their home is uniquely theirs.
As a result, using CNC machines for home décor is a popular idea and offers a host of CNC project ideas to sell, and even a great way to spruce up your own house too.
Home and Business Signs
- Download Example: Etsy
- Designer: Casey Reames
- Price: $2.50
As almost anyone with a CNC router knows, signs are one of the first things any of us look to make as wood projects. They’re cool, they’re fun to make, they’re an easy project for beginners, and they can be as creative as you like. But signs for various purposes are a great CNC project that sells well online.
CNC machining signs is a good money-making venture because they sell to both households and small businesses alike as welcome signs for any homey interior. From personalized wall art with custom messages to welcome signs for coffee shops and storefronts with a more personal touch, there are a lot of people out there looking for some unique, custom signs, so there’s a pretty big market out there with plenty of demand.
Signs are an easy project all things considered – as long as you know how to cut wood into the shape you need and include raised letters, you should be good to go!
Wooden Maps
- Download Example: Etsy
- Designer: CNC Router Relief Files
- Price: $3.30
Cartography is an art form that has taken something of a back seat in our modern days of satellite photos and pre-made posters, now turned into wood projects that most CNC routers can handle. Making a map is a great project to show off at craft fairs and can be made to order if you’re confident enough.
And so, mapmaking is one of those CNC project ideas that sells well to those looking for new and wonderful wall art, making for a profitable business idea.
Wooden maps can be as simple or complicated as you like, from simple one-layer maps to detailed topographical landscapes of mountain ranges and deserts. These designs can be kept minimalist or painted to accurately portray any stretch of land.
Using software to turn a topographical map image into DXF files will take some work. But once you’ve got it down, you’ll see why they’re a great idea to sell for anyone’s home décor.
Equatorial Sundial
- Instructions: Instructables
- Designer: JohnW539
- Price: Free
One of the coolest and most complicated CNC projects that sell that we’ll discuss here is the equatorial sundial.
The equatorial and meridian rings fit together and are mounted to the base. When installing, the sundial needs to be in an open space facing true north. However, exactly where you face your sundial and how to adjust it will depend on where you are.
(True north is different from magnetic north. You can find a guide to making your equatorial sundial face the right direction here.)
While far from the most accurate of time-telling devices – especially by today’s standards – the equatorial sundial makes for a beautiful garden ornament and a great project that gives us a nostalgic look back at how we used to ascertain the time.
This sundial makes an excellent garden ornament to sell online once you get the assembly down by following the instructions in the link above.
Seasonal Decorations
- Download: Etsy
- Designer: SVG
- Price: $4.05
Most CNC projects that sell make people feel they have something unique and truly special, and when it comes to seasonal events like Thanksgiving and Christmas, there’s always a subtle (or maybe not-so-subtle) competitive undertone to how we decorate our homes during the holiday season and more.
Because of this festive one-upmanship on special events, there are a lot of people who want to decorate their homes with unique, personally crafted decorations with unique designs to really show off how serious they are to neighbors, Thanksgiving dinner guests, trick-or-treaters, or any other guests on special occasions.
While only useful annually, they’re great to advertise in places like local craft fairs or other seasonal events. Unique designs are always in demand, and making them small and affordable only sweetens the deal for potential customers.
CNC Furniture
The best thing about making furniture is just how easy it is to sell. People are always looking to furnish a new home or revamp their old décor, and quality CNC machine-made furniture is always in high demand. Even if you’re a beginner, most CNC furniture plans will follow the same basic structure without straying too far from the different shapes we see every day.
CNC machines can make furniture that ranges from simple shelves and desks, to chairs and tables. They can be decorated and carved into whatever kind of shape or design you – or your customer – likes.
Furniture is also one of the things many people have had luck selling on places like Facebook Marketplace or Etsy, so you’ll have no trouble finding prospective customers.
One Day Chair
- Download: Thingiverse
- Designer: oomlout
- Price: Free
The result of a time-killing experiment, the one-day chair is as simple as it gets when it comes to CNC projects that sell. While this CNC design is as basic as it gets, the designers themselves recommend tweaking yours to ensure a stable and balanced finished project that sells well and makes a great gift.
It’s a quick and easy creation that you can stock up on and sell in packs. It’s also very easy to customize or alter as you or your customers see fit. Though if you’re looking for a project to make out of scrap wood, maybe avoid this one. Chairs need to be sturdy and safe, so be sure to use a high-quality wood to avoid any problems down the line.
Using lower-grade wood may make your products more affordable, but there’s nothing worse than a bad reputation for a business, especially an online one. Sites like Etsy rely on seller ratings, so you’ll want to make sure your wares are reliable and get good reviews.
Scissor Chair
- Instructions: Instructables
- Designer: pseaton
- Price: Free
Scissor chairs are equally simple but creative chairs that are great to use and sell because of how little material they use. They’re fantastic for beginners or for anyone selling their furniture to quickly build their stock with something easy noticeable to customers and their guests.
Because it’s easy to make, it’s another ideal project to show off at craft fairs to show off what you can do to your local community.
Like most projects on instructables, the instructions come with free CNC project files. So there’s no reason not to check it out or add the scissor chair to your line of CNC products to sell on your chosen website.
Zen Garden Table
- Instructions: Instructables
- Designer: MakrToolbox
- Price: Free
Of all the CNC machine-made tables we could find, the Zen Garden Table is by far our favorite. It’s a fun and relaxing end table design that needs a little more engineering to get perfect, but can accommodate, as the name suggests, a Zen garden that’s perfect for meditators or even just as a unique piece of furniture that you and your buyers will love.
You can even modify the design to have raised letters to spell out a chosen phrase or mantra!
Twin Bed
- Instructions: Instructables
- Designer: JeremySCook
- Price: Free
This easy design with room for engraving is a great choice as a gift or commercial item for any parent of a child who’s in need of a new, affordable bed frame.
Depending on your skill and confidence, bed frames can be as simple as any CNC machine project, or you can take some engineering prowess to add extra ideas and make yourself a foldout bed, a bunk with a desk underneath, or a bed with a handy drawer in the frame to store spare linens or clothes.
Again, regardless of whether you’re using this bed (or other bed projects) at home or selling it as part of your CNC business, you’ll want to make sure you create it using good quality wood and a sturdy, tested design. Unstable beds are dangerous, so you’ll want to ensure the wood is good and the design is sound.
CNC Projects for Pet Owners
It’s every animal owner’s wish to make life as easy and comfortable as possible for their little companions, furry or not.
And what better way to do that than by using your CNC machine to make some cool and unique things that pet owners will buy?
Simple CNC Dog Bed
This simple dog bed suits any kind of pet and is ideal for smaller animals like terriers and even ferrets that can’t manage elevated steps too well, and even includes the plans for a bone-shaped nameplate, making a unique purchase for your customers.
CNC Food Stand for Dogs
- Download: My Outdoor Plans
- Designer: Ovidiu
- Price: Free
Dogs, particularly lean ones, develop slower than most other animals. The growth plates in their bones won’t begin to properly fuse until they hit puberty, which normally happens at around 5 months old.
Until they’ve fully matured, it is hazardous to their health and growth to make them hunch over to eat.
It may be tempting to leave their food bowl on the floor and be done with it, but it could be doing long-lasting damage thatdd will cause severe problems further down the line. So any owner of a young dog will want to buy a raised feeding station.
CNC Homes For Iguanas
Let’s not discount an often-overlooked pet, though. Iguanas are possibly the most common pet lizards in America. I prefer geckos, but that’s just me.
Iguanas need a lot more space to thrive than their relatively smaller size would suggest. We don’t have a link for this one, as the design doesn’t need to be more complex than some strong chicken wire connected to a wooden frame, which can easily be made using a CNC machine by anyone, regardless of experience or skill.
As rainforest dwellers, they’re biologically programmed to be comfortable in wider, more open spaces where they’re free to roam. Strictly speaking, the standard aquarium tanks and store-bought enclosures are simply not big enough.
Constructing an iguana habitat is as simple as making a huge box with your CNC machine that can fit glass on three sides and a faux background on the remaining wall to give lizards a sense of space and freedom.
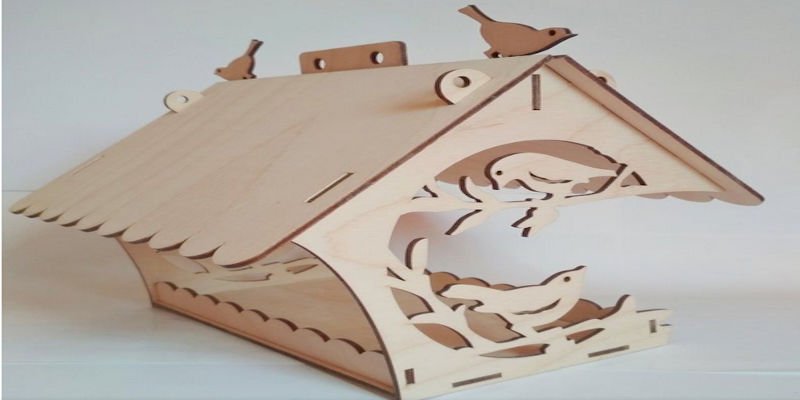
CNC Bird House and Feeder
- Download: Etsy
- Designer: Hugo
- Price: $2.58
Story time! When I was in college, I had a magpie that would stop by my bedroom window every day.
What started as a pleasant visit soon became more frequent, and I began to think of little Mitch as my pet. I had to hide my jewelry, of course, but that’s the price we pay.
Had I had access to a CNC router at the time, I’d have happily made this amazingly cute CNC bird feeder instead of buying him one.
It certainly would have made my daily visits from my corvine companion a little more special. And is sure to sell well for any garden owner and bird lover.
CNC bird feeders like this one is a great way to take care of our feathery friends, domesticated or not. And if you have access to a laser cutter or engraver, you can customize and decorate it even further for your customers!
Practical CNC Models
CNC machines aren’t just for decoration. You can also make practical pieces of furniture or just home additions that are great for any new homeowner or just someone who wants to give their décor a meaningful makeover with practical wares.
For both home use and selling, here are some useful projects and ideas to add some more practicality to your Etsy store.
Shelves
- Instructions: Inventables
- Designer: WorkinWoods
- Price: Free
Sorting and storing things is a must for anyone who wants to keep organized. And it’s not uncommon for those who regularly work on making CNC projects to have a lot of spare parts, tools and materials lying around.
This is why making your own cubby shelves should be the first thing any CNC enthusiast looks to do. They’re simple to make and assemble, look cool, and make tidying and sorting your bits and pieces a snap.
With enough engineering, these shelves can even be made foldable for easy storage and transportation, which also makes them easier to ship if you’re planning on selling them.
Cryptic Calendar
- Instructions: Instructables
- Designer: Wolfspaw
- Price: Free
Making calendars to sell with CNC routers may be easy, but to make your marketplace stand out you’re going to want something that’s not just a standard wall hanger.
Using hieroglyphic-like markings and an engraved slider, the pieces of this calendar line up together to make a functional calendar that not only looks cool, but makes for a cool CNC project for anyone who wants to make something a little different.
The markings may be indecipherable at first, but the combinations of shapes need to be made perfectly so the numbers are readable when slotted into the correct place. You’ll have a hard time selling a cryptic calendar that stays cryptic, after all!
Coasters
- Download: Etsy
- Designer: Bob
- Price: $2.90
Coasters are a good choice for anyone looking for a CNC wood project for a business. They require such little material that their profit margins are great for those who just have some extra wood lying around that they want to turn into some quick cash.
Personalized coasters can be carved by hand, or with an engraving instrument like the X-Carve CNC machine, and they can take no time at all if you have the right tools and skillset. More intricate designs or words can also be added to fit a customer’s needs, and can be sold as fully personalized sets on Etsy.
Bed and Bath Trays
- Download: Etsy
- Designer: Bern Agilemaker
- Price: $8.69
Something of an older sibling to coasters, bathtub trays are a useful little shelf that go across the bathtub to hold drinks, books, candles, or anything else you might want to have in the bath but keep out of the water.
Bathtub trays are a good example of a CNC wood project that sells because they’re the kind of thing that people never know how much they want until they see one. They can even be modified easily to make for kitchen cutting boards.
Workstation Cart
- Instructions: Evil Mad Scientist
- Designer: Windell Oskay
- Price: Free
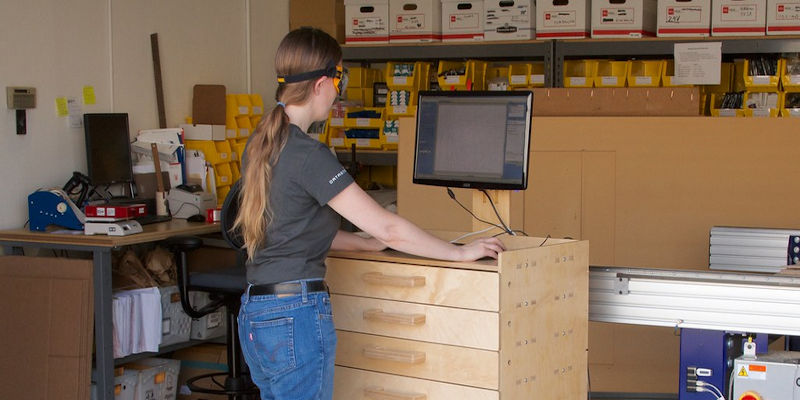
If you’re reading this, you’re likely a CNC fan, and therefore have a workspace in which you create your marvels. For this purpose, the CNC workstation cart was created.
Effectively drawers on wheels with an added desk space on top, this cart is a great piece of CNC furniture to keep your workstation neat. The drawers are sturdy and well made, and can house all the tools, screws, and other bits and pieces that might otherwise clutter up your workspace or simply get lost.
CNC Toys and Games
It’s harder than ever to shop for birthday presents these days. In the age where children of all ages have tablets and smartphones, there are a lot of parents and people with children in their lives who want to gift their special little ones with older style presents that are still cool and unique.
Toys make excellent CNC projects that sell, and here are just a few of our favorites.
Jigsaws
- Download: 3axis
- Designer: Dan
- Price: Free
One of the first things that come to mind when thinking of new CNC projects is jigsaw puzzles. While most of the time these are rectangular pictures, CNC machines have limitless potential in making more complex shapes. Because of this, jigsaws are a fantastic example of cool CNC router projects.
These puzzles are among the simplest of creations, making them great CNC projects for beginners that still yield impressive results. Though simple to put together, it’s a fantastic wood cutting project that your kids will love, and also makes a great gift.
There are many CNC router animal projects to choose from, including elephants, foxes, and dogs. For this example, we’ve chosen a simple turtle jigsaw.
Doll House
- Download: Etsy
- Designer: Kevin H Ch
- Price: $4.10
Doll houses have been a staple of the playroom since time immemorial, and are very popular CNC router projects today.
As well as making great gifts, doll houses are CNC projects that can really sell due to their customizability. While stencils for pre-designed houses are easy to find, creative engineers can design and reconstruct houses from movies, TV, and real life!
Making miniature houses as CNC projects to sell can even be modified for different purposes like bookshelves or bottle holders that practically sell themselves.
Coin Bank
- Instructions: Instructables
- Designer: pltwball
- Price: Free
While having way too many coins is a pretty great problem to have, it does not mean everyone is happy to have a ton of loose change covering their surfaces. This is where piggy banks come in.
With some neat engineering and plexiglass, this teddy bear coin bank is a great use for CNC routers that will make a cute and useful ornament to any home or a fantastic personalized gift!
While not strictly a ‘toy’, it’s an excellent addition to any child’s room as a way to teach little ones the importance of saving money in a way they can really see.
Honorable Mention: Combination CNC and 3D Printed Ukelele
- Download: Thingiverse
- Designer: CNCRouterParts
- Price: Free
Ukuleles are one of the simplest instruments to create, making them an ideal CNC wood project for beginners who want to make something fun that they can use and brag about.
Because this is a working instrument, you’ll need some extra parts:
- Tuners
- Ukulele bridge (can be purchased or 3D printed here)
- Fretboard (can be purchased or 3D printed here)
Once the wood is secured to the machine bed, the body is ready to be cut using CNC. This should only take about 20 minutes, so don’t stray too far!
Other project articles:
- CNC guitar plans and projects
- X-Carve projects
- Snapmaker 3-in-1 CNC projects (And 3D printing and laser cutting)
- Glowforge projects