The Ortur Laser Master laser engravers, such as the Ortur Laser Master 3, are some of the most popular engravers on the market. They’re made even more popular by the wide range Ortur Laser Master upgrades available to further improve their performance!
I’ve owned the Ortur Laser Master 2, 2 Pro, and the OLM3, and I’ve found the best Ortur Laser Master upgrades to be Ortur’s own YRR 2.0 Rotary Roller and the honeycomb platform. I also recommend the enclosure for safety, air assist for better quality cuts, and extension kit if you want to engrave large projects.
There are also some impressive third-party Ortur upgrades I’ll run through in this article.
In this guide, I’ll walk you through my hands-on experience with the best Ortur Laser Master 2, 2 Pro and OLM3 upgrades to achieve more powerful, precise, and flexible engraving.
- The Best Ortur Laser Master 3 Upgrades (And 3 LE, 2, 2 Pro)
- 1. Ortur YRR 2.0 Rotary Roller
- 2. Ortur YRR 3.0 Rotary Roller
- 3. Ortur YRC1.0 Rotary Chuck
- 4. Ortur Fiber Laser Enclosure 2.0
- 5. Laser Engraving Platform
- 6. Ortur Air Pump
- 7. Extension Kit For LM3 & LM2
- 8. Smoke Purifier
- 9. Foldable Feet
- 10. King Gubby Ortur Laser Master Pro 2 Upgrade Kit
- 11. Endurance Laser Upgrades
The Best Ortur Laser Master 3 Upgrades (And 3 LE, 2, 2 Pro)
1. Ortur YRR 2.0 Rotary Roller
- Price: Check price at Ortur here / Check price at Amazon here
- For: Laser Master 2, 2 Pro and 3
Pros
Lets you work on profitable rounded projects that sell well.
Well-made and flexible.
Adjustable height by up to 40mm.
Ortur’s cheapest rotary roller.
Compatible with all Ortur and Aufero machines.
Cons
Will likely require risers or foldable feet for laser for taller projects.
Limited to engraving objects up to 100mm in diameter.
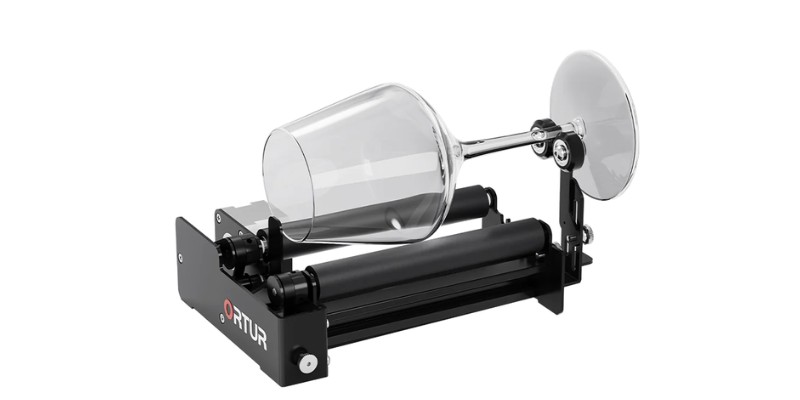
Ortur’s cheapest rotary upgrade is the YRR 2.0. This module has seven gear positions for engraving cylindrical objects of varying diameters from 8mm to 100mm, and the height can be adjusted by up to 40mm. It also has a bracket for holding the stem of wine glasses and similar objects for sturdier engraving.
This essentially performs the function of a rotational Y axis and therefore allows you to engrave cylindrical objects like glasses, mugs, tumblers and vases, so it greatly widens the range of projects you can work on.
The YRR 2.0 roller is a well-made, flexible piece of kit that has seven different gear positions you can use to adjust the width for engraving cylindrical objects of different diameters. The height is also adjustable by up to 40mm.

I found this module super easy to set up, and it took just 35 minutes to assemble. You just need to unplug the Y motor and attach the Y motor cable to the rotary roller using the included extension cable. It took around 45 minutes to assemble, and worked well. I still think the xTool RA2 Pro rotary is a nicer build overall, but it’s also $200 more expensive, so this is great value for money.
Bear in mind that you’ll need to adjust the height of your laser engraver by placing some form of support underneath.
To use the rotary roller, all you need to do is unplug the Y motor cable and reconnect it to the rotary Y axis via an extension cable. You need to use the LaserGRBL software to control the roller once it’s set up.
It’s compatible with all Ortur and Aufero laser machines. However, bear in mind that you need to raise the height of your laser engraver to accommodate a rotary attachment.
With the Ortur Laser Master 3, you can do this by buying the Ortur foldable feet (which we cover further down). Alternatively, you can source supporting blocks to heighten the laser engraver according to the size of your object.

2. Ortur YRR 3.0 Rotary Roller
- Price: Check latest price at Ortur here / Amazon here
Pros
Engrave wider objects than with the YRR 2.0
Can also engrave longer objects up to 600mm in length
Cons
As a roller, it’s less stable than a rotary chuck like the xTool and Snapmaker attachments offer
The YRR 3.0 offers a significantly larger engraving diameter of up to 150mm, ideal for engraving larger cylindrical objects. The YRR 3.0 has six levels for working with objects of various sizes and can support up to 600mm in length, so it’s also better for working on longer objects like rolling pins.
The Ortur website states you can engrave up to 3,000 mm/min using this module, which is pretty decent (it doesn’t state the engraving speed possible with the YRR 2.0). Although, this is someway below the Laser Master 3’s top speed, which can engrave up to 20,000 mm/min.
The YRR 3.0 can be used with all Ortur and Aufero laser engravers, as well as some machines from other brands. If you’re wondering about its compatibility with a specific model, you can ask Ortur directly via the product page.
I personally bought the YRR 2.0 when I first got my LM3, but I think the YRR 3.0 is a great option that I would have bought instead if it had been available when I bought my laser.
3. Ortur YRC1.0 Rotary Chuck
- Price: Check latest price at Ortur here / Amazon here
Pros
More secure and precise than rotary rollers
Adjust angle up to 180°
Can handle irregular and heavier objects
Has attachments for engraving cylinders, spheres, and rings
Cons
More expensive and bulkier than rollers
Lower diameter range than the YRR 3.0
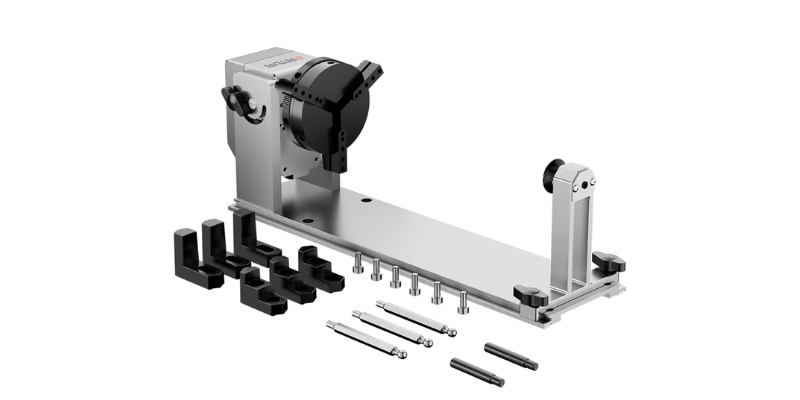
Ortur’s YRC1.0 is Ortur’s most expensive rotary upgrade. While the previous two models are rollers, this is a chuck. Whereas rollers use wheels to rotate a workpiece, chucks use metal clamps to secure the object and then rotate it in turn with it.
The main benefit of rotary chucks is that they are more secure, resulting in much more precise results. This makes them useful for making more intricate engravings on smaller objects, such as pens and rings.
They can typically handle heavier objects, so can be more suitable for things like metal flasks and rolling pins, and the clamp also makes them more suitable for irregularly shaped objects.
The YRC1.0 actually has three different tool options – the rotary chuck for engraving standard cylindrical objects, the sphere rotary for engraving ball-shaped products, and the ring rotary for personalizing rings and similar objects.
Although, bear in mind that Ortur’s diode lasers aren’t powerful enough as standard to tackle ferrous metals like gold and silver (you need an infrared or fiber laser for this).
This rotary attachment can engrave objects up to 120mm in diameter (using the chuck setting), and the angle can be adjusted up to 180°, making it a lot more flexible than a rotary roller. It’s compatible with all Ortur laser models.
The downside of chucks is that they’re a lot more expensive than rollers, are bulkier, and take up more space. The YRC1.0 also has more assembly steps than Ortur’s rotary rollers, but it’s still pretty easy to use.
We also have a more in-depth guide to the best laser rotary attachments.
4. Ortur Fiber Laser Enclosure 2.0
- Price: Check latest price at Ortur here / Amazon here
Pros
A lot cheaper than the metal enclosure
Compatible with Laser Master 3, S2 Pro, and S2
Fan and light can be controlled via mobile app
Cons
Not compatible with Laser Master 2 series
Less sturdy and durable than the metal version
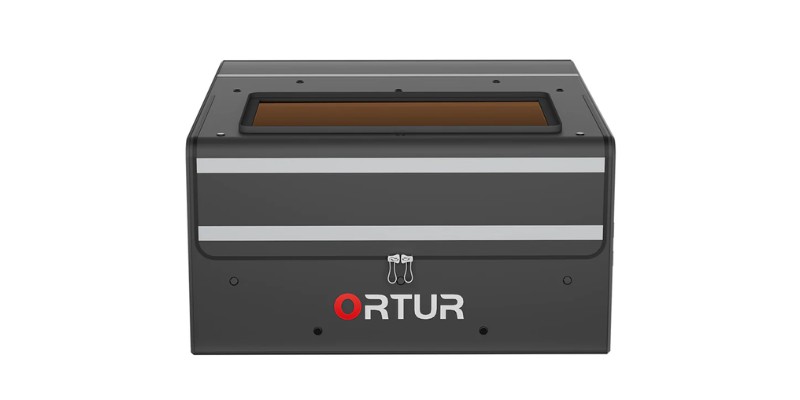
The Ortur Enclosure 2.0 offers a cheaper and more versatile option than the original metal enclosure Ortur sold. Whereas the metal laser enclosure is only compatible with the LM 2 Pro, this new 2.0 enclosure can be used with both the S2 and LM 3 series.
This enclosure is less than half the price of Ortur’s metal enclosure, mainly because it’s instead made of fiber material. This does make it somewhat less sturdy and durable than the metal version, but it’s still fireproof, waterproof, and dustproof.
It also comes with an exhaust fan and pipe, that you can position outside a window to prevent inhaling any fumes. Ortur state that the enclosure isolates 99% of dust particles, odors, and noise.
This upgrade is quick to assemble and can be folded up when not in use, and it has a viewing window complete with a light for monitoring your work. You can also easily control the light and fan using the Laser Explorer App.
You can, of course, use your Ortur laser without an enclosure. However, if you’re going to do this, it’s best to do it in a well-aired place with a face mask and eye protection.
The enclosure measures 700x720x370mm, and you can also use it with the Aufero 1 and 2 (Ortur’s sister brand), although bear in mind it isn’t large enough to accommodate the Ortur extension kit.
If you’re looking for an affordable kit that’s compatible with the Laser Master 2 Pro, you can check out the King Gubby Laser Enclosure, which retails from $107 and measures 660x660x558mm.
This is another fiber enclosure (hence the low price) that has two viewing windows and two exhaust ports. It’s also compatible with popular lasers from other brands, such as the xTool D1 and various Atomstack and Neje models, which is handy if you use multiple laser engravers.
Check out our guide on the best laser enclosures to learn more about the top options for different models.
5. Laser Engraving Platform
- Price: Check latest price at Ortur here / Amazon here
Pros
Secure platform to prevent damaging your desktop
Effective heat dissipation to prevent burns
Square notch design prevents the lens from being damaged by reflection
Cons
More expensive than other platforms
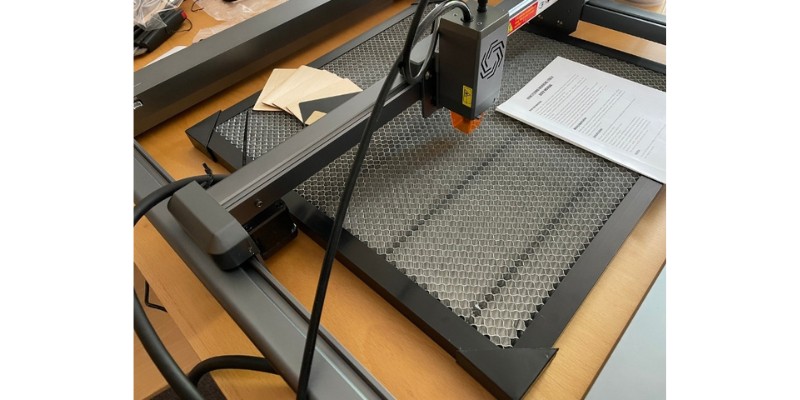
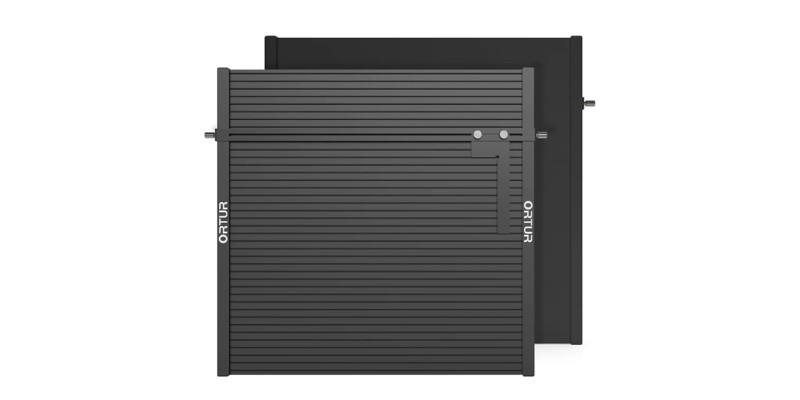
Another Ortur Laster accessory is the Laser Engraving Platform. This is a platform on which you can place your workpieces to prevent damaging your workbench surface underneath – especially useful if you’re engraving at home.
The platform also offers several other benefits, one being its heat dissipation effect. This reduces smoke and burns, helping you achieve smooth and clean engravings while also protecting you from oil stains.
This makes this accessory more suitable than using a wasteboard or spare piece of wood as a platform. On top of this, its all-metal construction can provide greater durability, and it has a square-notch design that prevents the laser module from being damaged by reflection.
The square notch design differentiates the Ortur platform from many other models which use honeycomb designs to dissipate heat and debris. Ortur claims its platform weighs 50% lighter than similar-sized honeycomb platforms (it weighs 1.75kg).
You can also quickly and easily adjust the position using the moveable fixed corner and rotating screws, without needing to reposition your workpiece.
The platform measures 400x448mm and can be used with all Ortur and Aufero lasers. One thing to note is that due to its high quality, it is more expensive than some other platforms. You can pick up some honeycomb platforms from places like Amazon for around half the price.
6. Ortur Air Pump
- Price: Check latest price at Ortur here / Amazon here
Pros
Achieve cleaner and more precise cuts
Protects the laser lens and can increase tool life
Cons
Not compatible with all Ortur laser modules
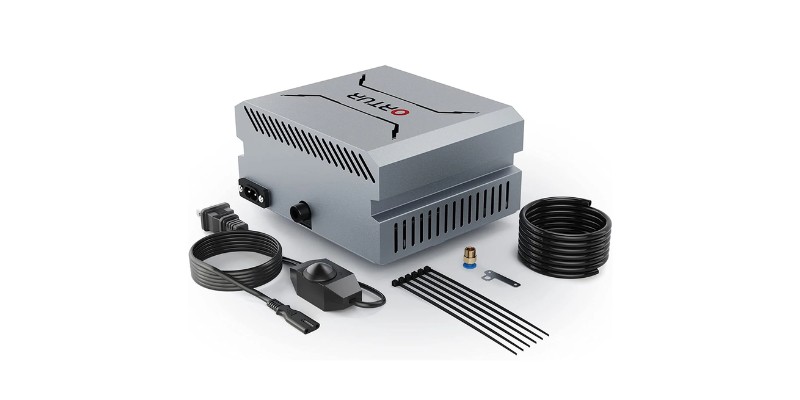
The Ortur Air Pump 1.0 is a really handy accessory to help you achieve cleaner engravings. This is because it rapidly clears smoke and debris as you work, while simultaneously improving your laser’s cutting power.
The result is sharper, clearer engravings, so it’s particularly useful for more intricate applications. The air pump also adds protection to the laser lens, helping to improve its durability.
This air pump is compatible with three laser modules from Ortur: the LUD2-4 LF, LU2-10A, and LU3-20A. This means you can use it with the Ortur Laser Master 3 and Laster Master 2 Pro S2, as well as the Aufero Laser 1 and 2.
However, bear in mind that it can’t be paired with some other Ortur modules, such as the LU2-2 or LU2-4-SF.
7. Extension Kit For LM3 & LM2
- Price for LM3: Check latest price at Ortur here
- Price for LM2: Check latest price at Ortur here
Pros
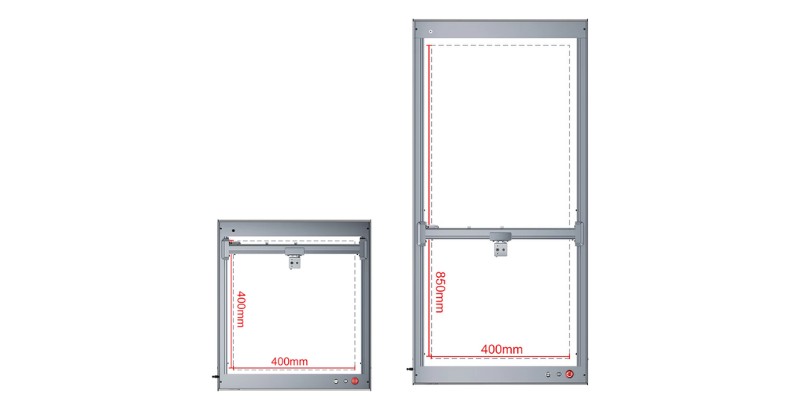
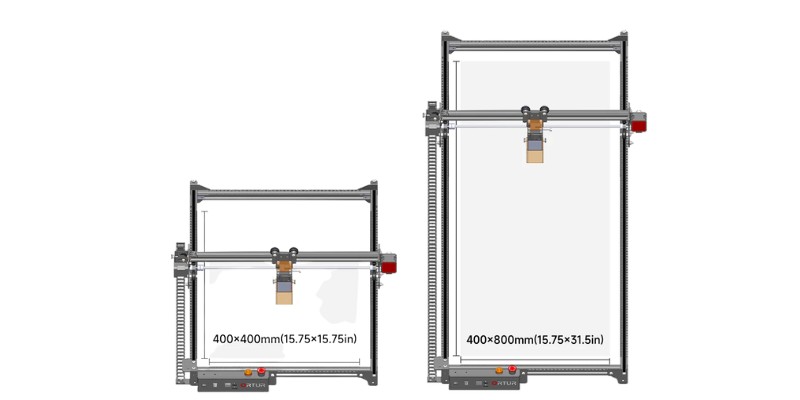
Increase working area from 400x400mm to 400x850mm / 450x800mm
Quick and easy to install
Cons
May not achieve the best accuracy if running your laser at maximum speed
If you have an Ortur Laser Master 3 series machine but are needing a larger working area, the OLM3 extension kit is a great option. This increases the engraving area from 400x400mm to 400x850mm (a 212% increase on the Y axis), giving you significantly more space to work with.
This allows you to work on a greater variety of large projects, including wall decorations, cabinet doors, and even skateboards and guitars.
The great thing about having the option of an extension is that you can start with the more affordable base kit if you’re a beginner, and then if you want to upgrade later on, you can get a larger working area for less than it’d cost to buy a new 400x850mm laser machine.
The Ortur Laser Master 3 extension kit is made of the same high-quality, durable aluminum alloy material as the base kit, so it provides good stability.
However, bear in mind that if you use your laser on the fastest settings, it may be difficult to maintain top precision. Ortur states the extension kit remains accurate up to speeds of 200mm/s across the increased working area, which is less than the top speed of the LM3, which is around 333mm/s.
Ortur also provides an extension kit for the Laster Master 2 series which is cheaper and slightly smaller, extending the Y axis to 800mm instead of 850mm. Other than that it’s essentially the same and uses the same high quality components.
Both these kits are as simple to set up as a base Ortur laser kit – you just need to assemble the frame and then attach your laser module.
8. Smoke Purifier
- Price: Check latest price at Ortur here
Pros
Allows you to safely use your laser within enclosed spaces
Quiet
Efficient and can prevent overheating
Easy to setup and use
Cons
Expensive
Filters need to be regularly replaced
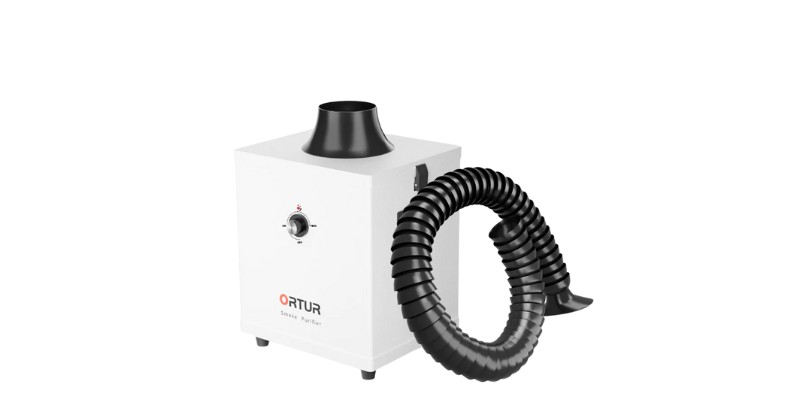
It’s really important to take the right safety precautions whenever you’re working with a laser engraver, and the Ortur Smoke Purifier 1.0 can help prevent potential hazards.
This needs to be paired with the Ortur Laser Enclosure, and it works by attaching to the enclosure via a tube. It’s a flexible piece of kit, as the tube can rotate 360 degrees and is also flame-proof.
The purifier extracts the smoke and dust from the enclosure and uses a three-layer filtration system to purify it to a purification rate of 99.97%. The main benefit of this is that it allows you to safely use your Ortur laser engraver in your home or other enclosed space without worrying about inhaling harmful gasses.
It can remove smoke at a volume of 258m3/h, so it’s effective even when you’re engraving at top speed. The <50dB noise rating also means you can maintain a quiet working environment.
Another benefit is that it quickly dissipates heat, which can help prevent your laser from overheating.
The purifier has three filtering elements: the primary filter needs to be replaced after 7-15 days of use, the medium-efficiency one after 2-3 months, and the high-efficiency one after 3-6 months. You can order replacement filter elements from Ortur.
The only real downside of this Ortur Laser Master upgrade is its price. If you use your engraver outside, or if you have the enclosure and are happy to position it near a window so you can safely expel fumes through the exhaust pipe, then it’s probably not worth the investment.
However, if you want the convenience of being able to safely use your Ortur within enclosed spaces and away from a window, it’s definitely recommended.
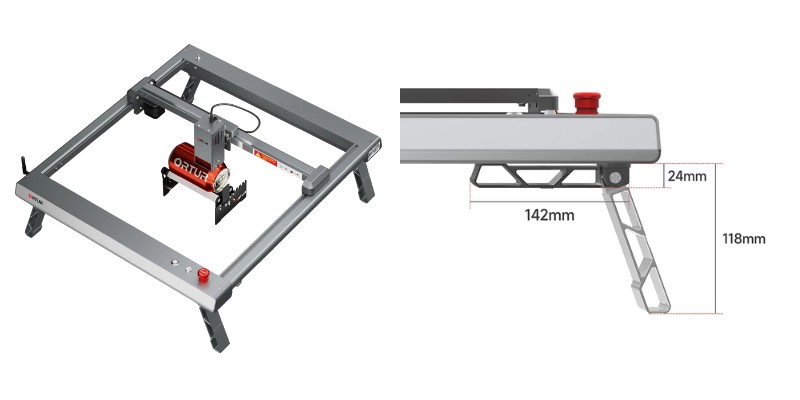
9. Foldable Feet
- Price: Check latest price at Ortur here / Amazon here
Pros
Raise your Laster Master 3 up to 118mm off the ground to work on taller and spherical objects
Specifically designed to work with the Ortur Rotary Roller 2.0
Made of aluminum alloy for great stability and rigidity
Cons
More expensive than other options
Limited in the height you can add to your laser (stackable bricks are more flexible)
If you want to use a rotary module with the Laser Master 3, the Ortur Foldable Feet can help make your life much easier.
These raise the machine up to 118mm off the ground, allowing you to easily and precisely engrave spherical objects. You could use DIY options for this, but the Ortur Foldable Feet are specifically designed to be paired with the Rotary Roller 2.0 and therefore will likely help you achieve higher accuracy.
This is partly thanks to their aluminum die-casted material, which provides greater stability and durability than if you were to use wooden blocks to raise your engraver off the ground.
These accessories are also useful even if you’re not working on circular objects but rather thicker flat objects that the Laser Master 3 would otherwise be too low to work on, like a chess kit case, jewelry boxes, or just thick cuts of wood.
You can attach the feet within minutes by simply screwing them on using the provided Allen keys, and as they’re foldable, you can simply fold them up when you’re not using your engraver. This helps save space without having to remove and reattach the feet each time you’re working.
If you’re looking for a cheaper alternative, King Gubby also provides feet for the LM 3 for around just $30. These work by screwing one foot to your wasteboard and one to your engraver, and then adding bricks between (which retail from around $1 each).
Each brick is 1.25” high, and the benefit of these is that you can essentially raise the height without limit. However, bear in mind that adding more blocks can decrease the stability of your laser, and you also need a wasterboard to screw the feet into (where the Ortur Foldable Feet can be used on any surface).
King Gubby also offers an equivalent product for the LM 2.
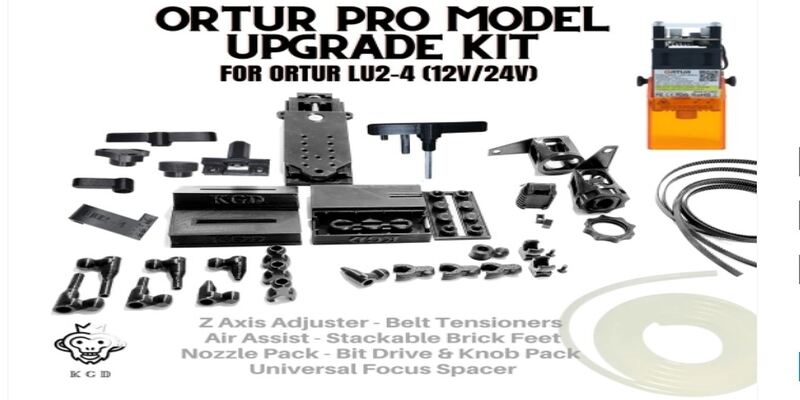
10. King Gubby Ortur Laser Master Pro 2 Upgrade Kit
- Price: $103.99 – Available here
- For: Laser Master 2 Pro
Pros
Extensive range of accessories in one kit
Affordable compared to buying each from Ortur
The air assist allows for deeper and cleaner cuts.
Cons
Not manufactured by Ortur.
Up until now, the Ortur Laser Master 2 Pro upgrades we’ve covered so far have all been manufactured by Ortur.
However, the King Gubby Ortur upgrade kit is made by King Gubby, a third-party brand that 3D print upgrade kits for popular lasers like Ortur, Atomstack, xTool, Neje, FoxAlien, and more.
This is a really extensive kit that includes the following:
- Z axis adjuster
- Belt tensioners
- Air assist
- Stackable brick feet
- Nozzle pack
- Bit drive and knob pack
- Universal focus spacer
Let’s start with the air assist – this allows you to achieve deeper, cleaner cuts, as the air assist removes debris as your machine engraves. It’s compact and slim and can be easily attached to your Laser Master 2 Pro via the threaded holes on the bottom of the machine.
The Z-axis adjuster makes it simple to adjust the laser module height by up to 40mm, while the Y-axis belt tensioners let you tighten the belt using the threaded knob. This achieves smoother movement via better belt tension, and better precision and performance.
You get six different size air assist nozzles in this Ortur Laser Master 2 Pro upgrade kit, ranging from 22mm to 34mm in length, for adjusting the degree of debris removal. The focus spacer is an additional nice add-on that makes it quick and easy to find your ideal focal distance.
Another part of the kit is the stackable brick feet, which are acrylic supports that you can use to adjust the height of the entire laser engraver for working with larger workpieces. This video shows you how to set them up.
While some people may be reluctant to use upgrades not provided by your engraver’s manufacturer, King Gubby, which is based in California, has made over 3,000 sales on Etsy and has a 5-star rating on the platform.
Plus, at just $103.99, these Ortur Laser Master upgrades are really affordable. However, there aren’t as many options for the newer Laser Master 3, with only the brick feet, which are a cheaper alternative to Ortur’s foldable feet, and the z-height adjuster.
11. Endurance Laser Upgrades
- Price: from $345
- For: Laser Master 2, 2 Pro, 3
Pros
Variety of different laser modules to buy.
Increased power lasers, including 15W option.
Made with internal and external heatsinks, fans, and air nozzles to prevent overworking and help achieve the best performance.
Cons
Not recommended for beginners.
Endurance Lasers manufactures a variety of powerful laser modules that can be attached to popular engravers like the Laser Master models. They’re written specifically about adding Endurance lasers to the Ortur Laser Master engravers.
Endurance offers a variety of different laser modules which differ a lot in terms of size and power. The following are available from the company’s website:
- 5/5.5/6W – $345
- 10W Basic – $395
- 10W DeLux – $495
- 10W Plus – $745
- 10W Plus Pro – $895
- 20W – $995
- 30W – $1,295
- 445nm 15W – $1,495
- 10W DPSS infrared – $2,450
Now, which one you go for will depend on your needs, budget, and the Ortur Laser Master model you have. The site doesn’t specify what machines each module is compatible with, although it says, “for the most part, you can choose freely”.
It does state that heavier Endurance Lasers like the 10W Plus are suitable for the Laser Master 2 and 2 Pro, but not the original Laser Master model.
Most information available online, such as this video, focuses on adding the 10W Plus model to the Laser Master 2. That particular laser upgrade has a 445nm wavelength and offers considerably more power than the standard modules than standard 5W lasers – and the same wattage as the OLM3.
According to Endurance, this 10W Ortur laser upgrade is capable of cutting acrylic up to 8mm with 2-3 passes, and wood up to 3mm with 1-3 passes.
Not only is it better for cutting, but the increased power means it’s also better at engraving metals like aluminum, copper, brass, and stainless steel.
All the Endurance laser modules are well made, with internal and external heatsinks, fans, and air nozzles to prevent overworking and help achieve the best performance.
Each also comes with a control board complete with a thermometer for monitoring and controlling every aspect of your work.
If you have a Laser Master 2 or 2 Pro, you’re probably best off with one of the 10W modules. If you have the 10W Ortur Laster Master 3 then you’ll probably want the 15W or the 20W.
However, adding an Endurance Laser to your Ortur Laser Master is not a simple process, and I don’t recommend it for beginners. There’s a detailed article on Instructables on the 14 steps taken by one enthusiast to upgrade their Laser Master 2 with a 10W Endurance laser, which is definitely worth a read if you’re considering adding one of the best upgrades for the Ortur Laser Master.
You may also like:
- Ortur Laser Master 3 vs xTool D1 Pro 10W
- The best acrylic laser cutters
- The best wood laser cutters and engravers
- The best laser engravers for metal
- 7 top Glowforge alternatives
- The Maslow CNC review
- Best Ender 3 Laser Engraver Upgrades