Before we ever got to test the Ortur Laser Master 2 Pro, our expectations were admittedly already sky-high. We previously reviewed the original Ortur Laser Master 2, and were very impressed by how powerful, accurate and reliable it was for such a low cost laser cutter.
You can also read our original review of the Ortur Laser Master 2.
The original Laser Master 2 was immediately added to our best laser cutter recommendations ranking, and we were beyond excited as soon as we heard a premium upgraded model was releasing.
Enter the Ortur Laser Master 2 Pro, the even more powerful, safer, more reliable and overall improved version. Though the two machines share the same build area of 400 x 400 mm, they look vastly different thanks to the Laser Master 2 Pro’s added laser shield protection, and added features.
Naturally, these improvements mean the Ortur Laser Master 2 Pro costs more than the original, so we set out to test it and make our decision over whether it’s worth shelling out the extra couple hundred bucks on the Pro version.
The Ortur Laser Master 2 is an excellent option if you're seeking for an economical but dependable, secure, adaptable, and high-quality DIY laser engraver.
Main specs:
- Price: $449 — Available at Ortur here
- Work area: 400 x 400 mm
- Laser Speed: 10,000mm per minute
- Laser Power: 20W
Main Pros & Cons
Pros
Powerful, cutting through thick woods at slow speeds.
Accurate and precise cuts.
Versatile, with a wide range of material compatibility.
Cons
Instructions are difficult to read.
Cable management is required.
Pros
Powerful — the Ortur Laser Master 2 Pro did not struggle to cut through any of the materials we tried while setting it up to engrave, and other tutorials have shown it cut comfortably through much thicker woods when using multiple passes at slower speeds.
Accurate — you can get really crisp and precise cuts and engravings with this machine.
Versatile — you can engrave almost anything: leather, cardboard, paper, wood, acrylic sheets, tiles, glass. The Ortur Laser Master 2 Pro turns your workshop into a full manufacturing solution, and you can cut your own shapes, or engrave your logo on to anything — and do it on-demand.
Cons
Paper documentation could be easier — but if you have any trouble, there are some amazing resources online that make assembling and starting up your laser cutter a breeze.
Wires require some tying back with the clips to prevent them from affecting your engraving.
Building the Ortur Laser Master 2 Pro
The Ortur Laser Master 2 Pro comes in a few dozen pieces (including the 20-ish screws) that you will need to put together in a series of simple stages.
Laser cutters and engravers haven’t quite reached the same level of accessibility of 3D printers in the last year, with beginner-friendly 3D printers like Creality’s CR-10 range or Anycubic’s FDM printers taking just 5-10 minutes to assemble and start up.
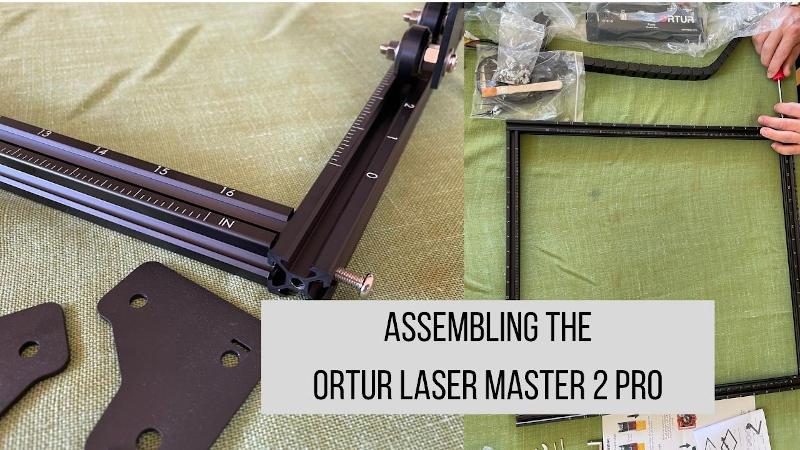
However, considering its complexity, we feel the Ortur Laser Master 2 Pro was relatively easy to put together — especially if you’ve got an engineering background or some experience laser cutting or with DIY.
The physical instructions that come with the Ortur Laser Master 2 Pro are fine for anyone with experience with these types of machines. However, beginners could find the occasional instruction difficult to infer. To help here, Ortur have more extensive documentation if you scan a QR code that comes with your laser engraver, including video guides to extras like optimizing the laser spot.
It took around 70 minutes to fully assemble the laser engraver — from opening the package, to having it built, connected via LightBurn and ready to cut — but it would have been around 45 minutes if we had not made a trivial error at the beginning of the build process. This error was putting the M5 profile nuts in the wrong sides of the laser cutter’s body, which required painstakingly disassembling it, moving them to the right sides, and going from there.
There are some fiddly parts that can be frustrating, like using very small screws and trying to thread them into difficult-to-reach areas, but that’s just part of DIY building.
We used LightBurn, the laser cutter software that we believe is one of the easiest and most effective tools available for any avid maker. It costs $40 however, but you can try it out with its 30-day free trial. If you’re using a Mac then it’s your best option as LaserGRBL won’t work for you, but Windows users also have LaserGRBL as a free engraving software option.
Ortur Laser Master 2 Pro Test
We were most interested in trying out the laser engraving aspect of the Ortur Laser Master 2 Pro. We were already impressed by the original Laser Master 2’s power with cutting and engraving wood (and other material) surfaces, and tested it to see how well it could laser engrave the wood test pieces Ortur sent us to try out.
We started off with a simple rose engraving — not too many details, just contrasting lines for the outline and main features. This was to find the right settings before we went all in on a more detailed image.
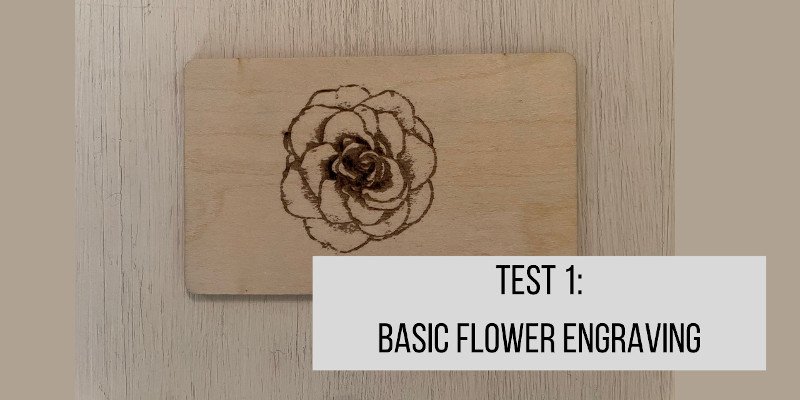
Our first test made it clear that we needed to change the settings. The laser speed by default was set far too fast, and led to a faint image without the contrast or boldness we were looking for in the image.
Note to self: slow the speed down.
So we halved the speed, down to a healthier 50 mm/s in LightBurn, and used the same 80% laser power. The Ortur Laser Master 2 Pro has a very powerful laser, and while we’d be more likely to use 100% power in normal day-to-day use, for the thin tester pieces we were given to test the laser we put a leash on it — they would cut straight through, rather than engrave the piece!
The results were much improved, though we’d probably optimize our settings a little more in future.
After that successful flower engraving, it was time to up the stakes a little:
We picked a much more complex and contrasting image with deep, dark tones, grey midtones, as well as lighter tones that would require precise laser burning.
This image was a cocktail glass, filled with different shades for the liquid inside, as well as the accessories, like the cherry, that come with these fancy aperitifs.
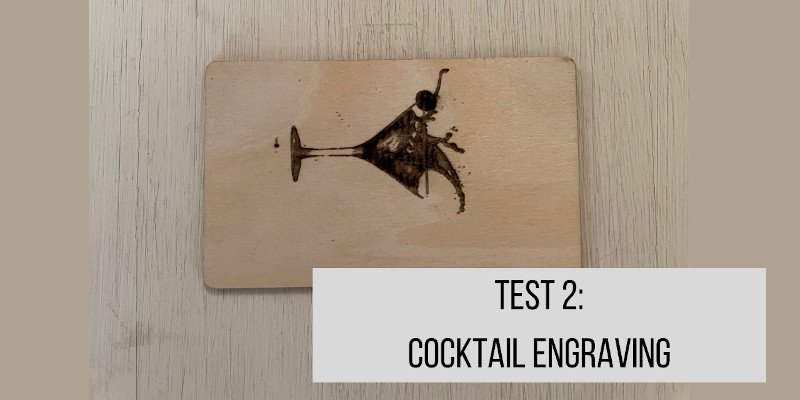
This one came out better than the flower — it seems that the Ortur Laser Master 2 Pro thrives with more complex imagery, giving it the opportunity to show off its detail and precision.
It almost didn’t need the second pass of the laser (we were running with two passes). This was definitely needed for the first flower image we engraved, but for this piece, even after one pass, we paused the machine and found the image was already heavily contrasted and well burned into the wood.
We would have stopped it, but we were curious how it would look after another pass, and there was one small area on the thin part of the glass that wasn’t fully engraved after the first pass. After the second pass, the image was crisper (as was the material, it had burned deep into the wood!) and bumped it up to that high contrast look with dark tones that makes an image pop.
Another image we did was a Pikachu.
We downloaded the image, converted it to a higher-contrasting greyscale version, and set it up for engraving in LightBurn.
Quick note: if you have smaller pieces of wood like we were sent to use, use LightBurn’s Frame tool to show exactly the dimensions your laser will be traveling, so you can accurately place it for the best results.
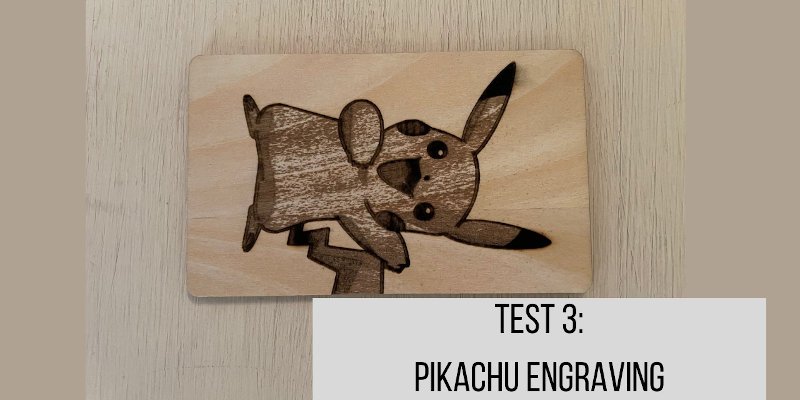
We slightly reduced the laser power to 75%, as these pieces of wood were very thin (for standard engraving, this would be fine to keep up to 100%), but kept the speed and number of passes the same.
The Pikachu had fairly uniform shading, with four different shades. This was intriguing as we could directly see how the Ortur Laser Master 2 Pro would handle each shade.
We were again impressed — you can see exactly where each shade contrasts with every other shade, again showing the Laser Master 2 Pro’s precision and accuracy to engrave each level of darkness on the wood.
Overall, it engraved a very high quality and clear, precise image.
Full Specs
Price: $449 — Available at Ortur here
Working area: 400 x 400 mm
Laser Power: 20W
Connectivity: via USB
Wavelength: 445±5nm
Software compatibility: LightBurn, LaserGRBL (not for Mac)
Compatible materials: woods, acrylic, leather, paper and cardboard, glass, stainless steel, powder coated metal, and many more
Laser Speed: up to 10,000mm per minute
Motherboard: 32-bit OLM-MAXUP-V10
Firmware: OLF-V.15
WiFi connectable: No
Motors: NEMA-17 stepper motors
Image compatibility: JPG, JPEG, PNG, BMP, SVG and more
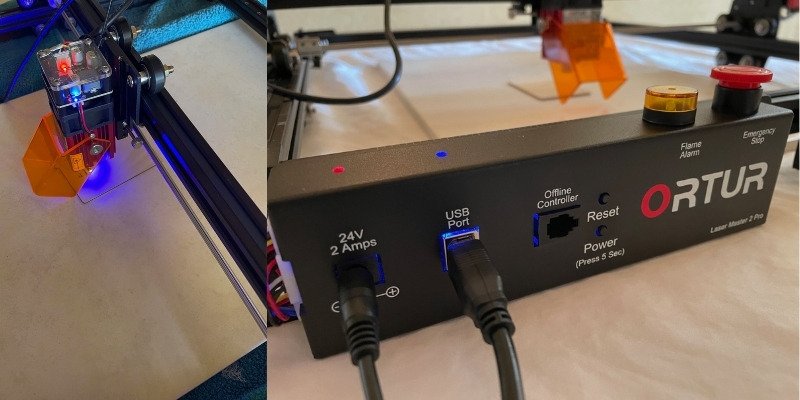
Safety features: active flame detection, emergency stop (such as if the laser head gets stuck), g-shock sensor, exposure duration and limitation
Optional add-ons: offline controller, manual z-height adjuster, YRR 2.0 rotary attachment.
Precision: Y-axis = 12.um, X-axis = 12.5um
Default focal length: 50mm
Read more:
- Ortur Laser Master 3 review
- Ortur Laser Master 2 Pro vs Ortur Laser Master 3
- Ortur LM3 vs xTool laser comparison