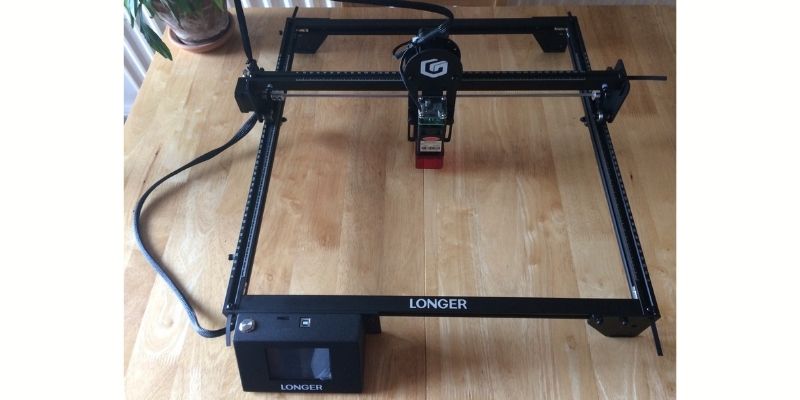
Thanks to Longer making inroads into the competitive 3D printer space with dependable, cost-effective machines, we were naturally excited and intrigued about the Chinese company’s first foray into laser engraving. Enter the Longer Ray 5, a factory-fresh version of which Longer was kind enough to send our way to test out.
With a price tag most won’t immediately balk at, Wi-Fi connectivity, a hefty 400 x 400 mm work area, and a modest but versatile 5.5 W diode laser, there’s plenty to tempt here. Not bad on paper for a first try, especially with the likes of the excellent Ortur Laser Master 2 Pro dominating the accessible, budget segment.
But marketing appeal aside, how does it fare in the flesh? Is the Longer Ray 5 yet another forgettable entry into the affordable laser engraver category or wise use of your limited DIY pot?
Let’s find out.
Main Specifications:
- Price: $329.00 (only with our coupon) — Available at Longer Official store here
- Speed: 40mm/min to 6000mm/min
- Work area: 400 x 400 mm
- Laser: 450-460 Nm 5.5 W diode
THE REVIEW
Longer Ray 5
Available at:
Pros
- Reliable, precise engraving and cutting – sharp and crisp results with the right settings.
- Large work area – plenty of room for large hobby projects and even light small business applications.
- Usability – with a touch screen, Wi-Fi, and offline engraving, firing and managing projects is a doddle.
Cons
- Poor quality paper instructions.
- Open-design means smoke, fumes, and odors aplenty.
- Protective shroud only covers the front and sides of the laser module.
Assembling and Setting Up The Longer Ray 5
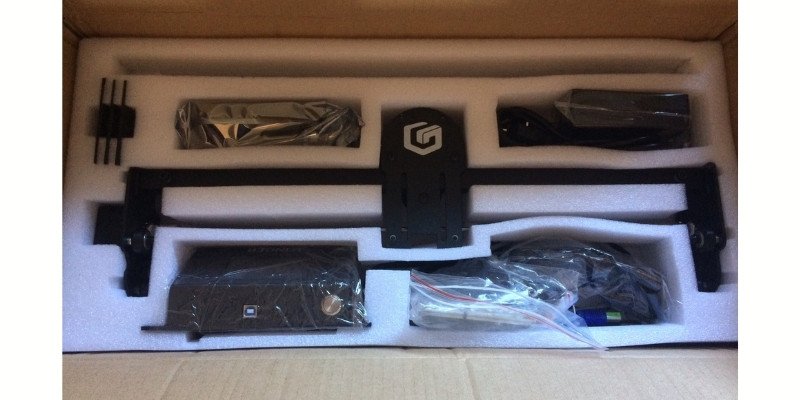
The Longer Ray 5 landed on our doorstep in a thick-set cardboard box, cocooned in foam with cutoffs for each part. Traveling from Shenzhen, China, to rainy England, the engraver doesn’t appear to have suffered any damage.
Unclear paper instructions with rough translation throughout soured what was ultimately an involved but fairly straightforward assembly process. Piecing the Ray 5 together doesn’t require any feats of manual dexterity, but knowing what goes where and when isn’t always crystal clear.
Fortunately, an instructional video, loaded onto the provided USB drive and sound-tracked to a jaunty classical ditty, swooped in to save the day.
It’s a DIY kit, a norm in the budget engraver space, but Longer has tried to keep things simple with no more than ten major parts. The company made the sound choice of collecting screws for each step into the same plastic baggie, so no rummaging around in a sea of screws and washers. Manually installing the x-axis timing belts came with some trepidation at first, but Longer has done well to make it an effortless task.
All-in-all, from tearing off the packing tape on the shipping box to firing up the engraver for the first time took approximately 45 minutes, but seasoned DIYers should blaze through in much less. Word of advice for DIY beginners; stick to the video to save yourself some hair-pulling frustration and wasted time.
Aside from the kit, the box includes a selection of Allen keys and wrenches, a USB drive (with an SD card), a USB cable, a wooden brush, a power cable, three test 2 mm plywood sheets, a focusing column, and a pair of rather dashing protective glasses.
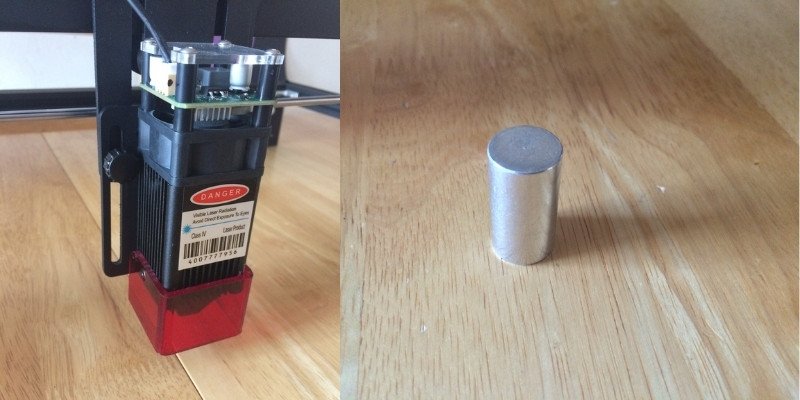
Every cut or engraving starts with manually focusing the laser based on the wood, tile, etc., height. A chunky aluminum focusing column slides between the wood and the laser head. The latter is loosened thanks to a pair of easily accessible thumb screws and lowered until it touches the column. Tighten the screws, and you’re set. It’s a simple and effective solution that delivers spot-on focusing everytime.
The touch screen works well for the essential functions it covers. The frame option, in particular, proves invaluable for getting a visual sense of where the laser will be traveling to perfectly line up the wood, tile, acrylic, etc.
The Longer Ray 5 ships with Windows installation files for LaserGRBL and LightBurn, two of the leading engraver programs. Mac users will need to jump onto Lightburn’s website to grab the macOS version. We opted for LightBurn, launched the free 30-day trial, and got to work seeing what the Longer Ray 5 could do.
Longer Ray 5 Test
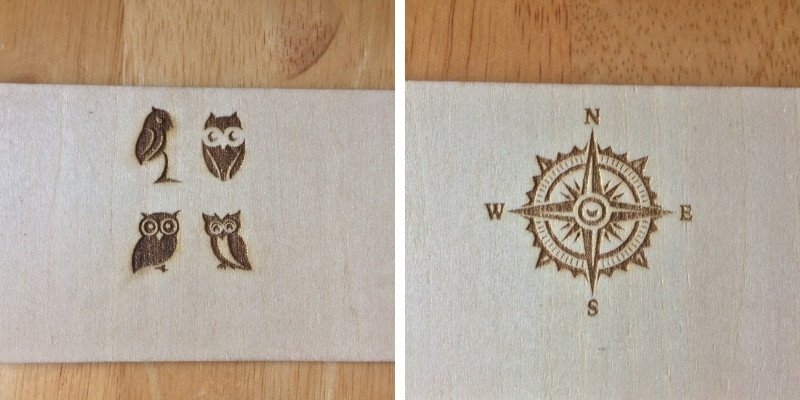
Bird and Compass
We fired up the bird and compass laser files on the provided TF Card for our first run. We used the 2 mm plywood test sheets Longer bundles alongside the engraver.
The results were solid, suitably deep, and with all the details, notably, the pointy patterns on the compass, well-rendered, and there were no discernible burn marks or discoloration. A strong first outing.
CNCSourced Logo
Next, we called upon our trusty CNCSourced logo, engraving it onto a cut of 15 mm chipboard with the laser set to 3000 mm/m at 30%, aiming for a gentle negative image effect. The light, almost white shading came out great. Both the lettering and drillbit logo were sharp and well defined.
We used the same logo for our following engraving, but without the negative image effect, and tuned the settings slower and more powerful to 2000 mm/m at 80%. The result was a richer and darker engraving, striking a solid contrast with the underlying oak hues of the chipboard. Once again, the letter/logo rendered beautifully.
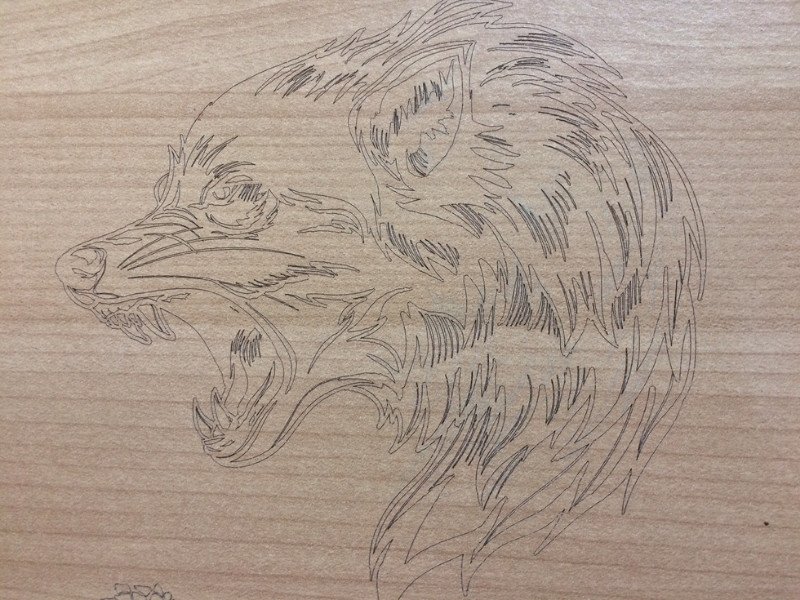
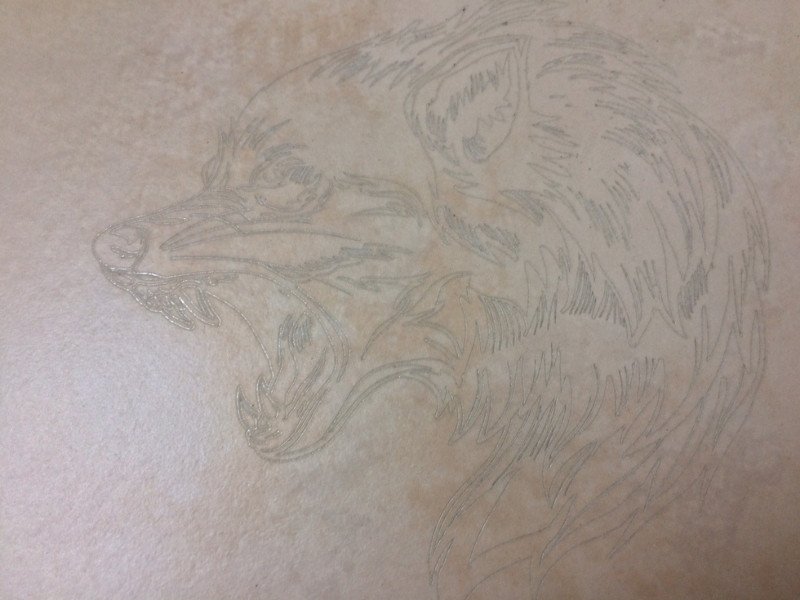
Bear and Bird Stencil
Tweaking the settings to 3000 mm/m at 70%, we pivoted to a more detailed vector of a snarling bear, upping the size to understand how the Longer Ray 5 performs at scale.
The engraver worked fast and efficiently, generating all the complex line-work of the original. A great result spurred us to print a similar line stencil of two birds flapping about a freshly-bloomed plant.
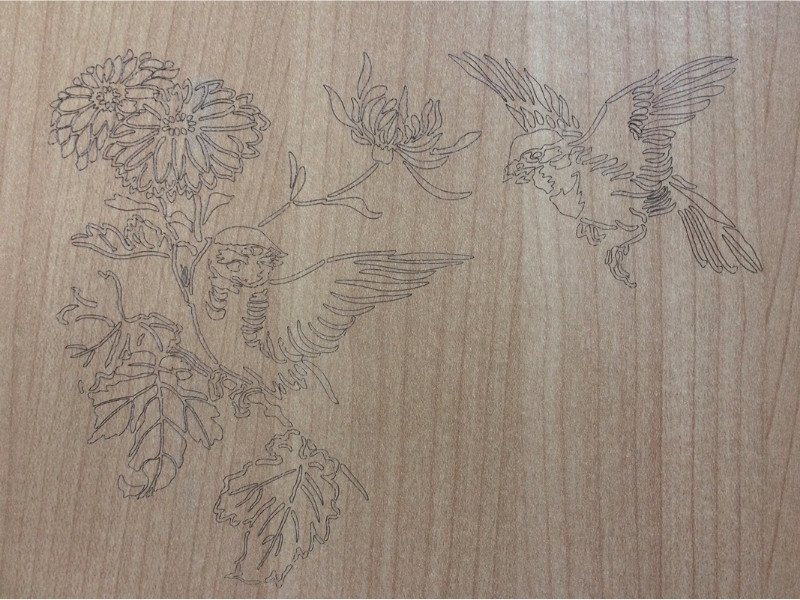
The results were once again precise and fantastic overall. What truly stands out is the near absence of burn marks or unwanted visual artifacts from the engraving process.
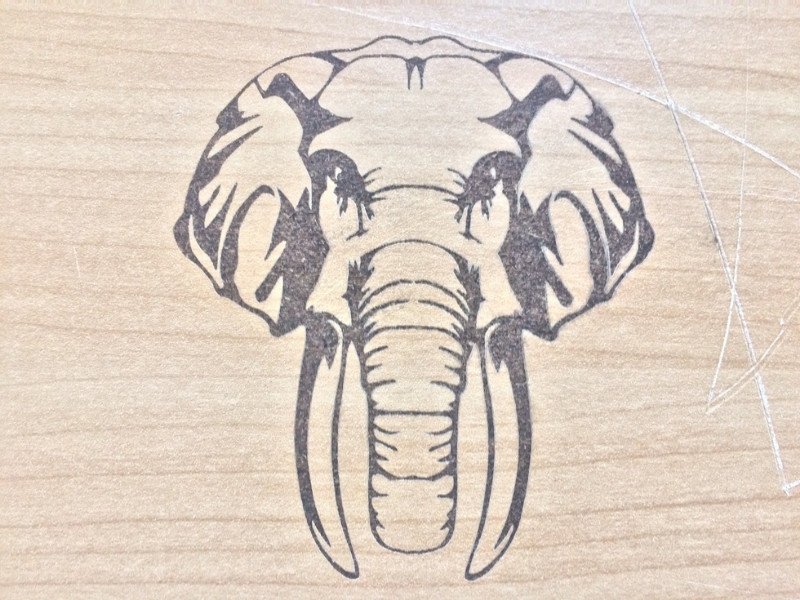
Elephant
Moving on from detailed line-work, we shifted to engraving an stylized elephant to test out the Ray 5’s shading and contrasting abilities.
We stuck to the same speed and power settings given the quality of the bear engraving.
As you can see, the Ray 5 produced a deep shade of black for the infill parts while generating thick, deep-cut outer lines and details.
Tile Engraving
We set up a sheet of ceramic tile for the last of our engraving tests to see how the Longer Ray 5 fared with tougher material. We engraved the same snarling bear line vector as above. The first pass at 1000 mm/m at 80% power disappointed us with only a light engraving. Not quite what we had hoped, but we knew settings were the culprit here.
We dialed things up to 500 mm/m at 90% power for a better overall result that wasn’t too far off what we managed to obtain with the chipboard. Slowing the laser and pushing the power to 100% produced even better results on tiles.
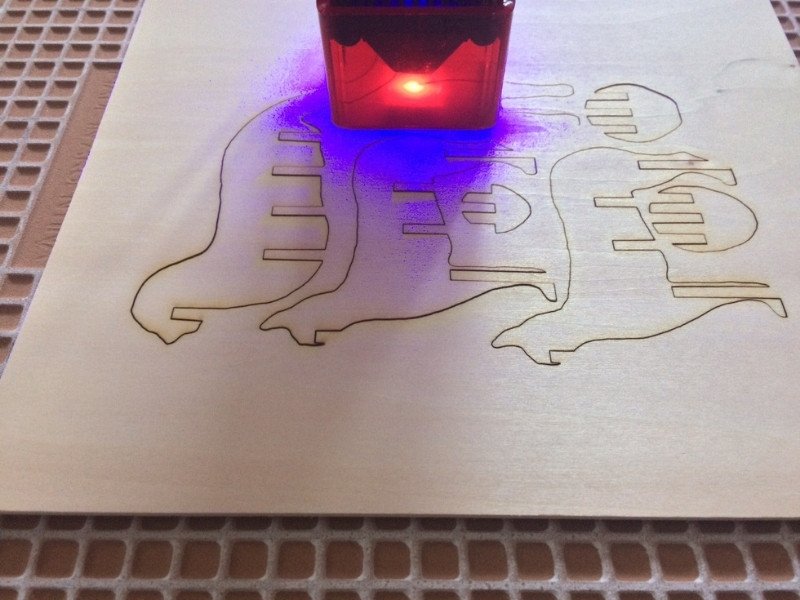
3D Cat Puzzle
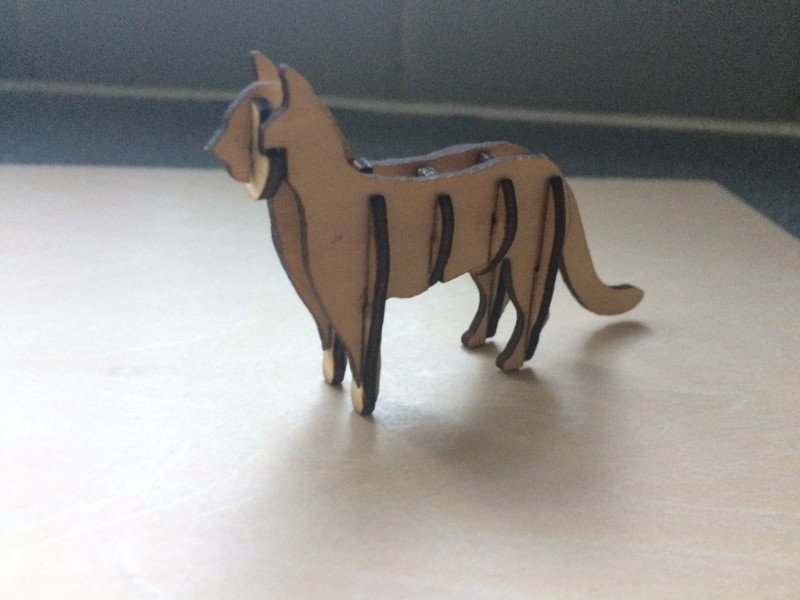
Though chiefly billed as an engraver, the Longer Ray 5 has enough laser power to slice through thin softwoods like basswood. Consequently, we’d be remiss not to give this a go. We loaded in a vector of a 3D cat puzzle and tuned the settings to Longer’s recommended 300 mm/m at 100% power.
We were thoroughly impressed with the result, happily piecing together the little cat afterward. The Longer Ray 5 delivers clean cuts, reproducing precise features even at lower dimensions.
Burn clouds appear on the underside of the basswood. That is a common trait for laser engravers in this price range, so hardly something we can hold against the Longer Ray 5.
Lowering the laser power mitigates the clouds a little, though this is no silver bullet. Reduce power too much and the machine won’t cut cleanly. Removing them entirely isn’t on the cards here. Of course, you can always rely on some handy tape masking to protect the wood should you need pristine cuts.
According to Longer, the Ray 5 can cut pine up to 6 mm, though we didn’t have any on hand to test. We don’t doubt the engraver generates great results with slightly thicker wood based on the excellent basswood cutting.
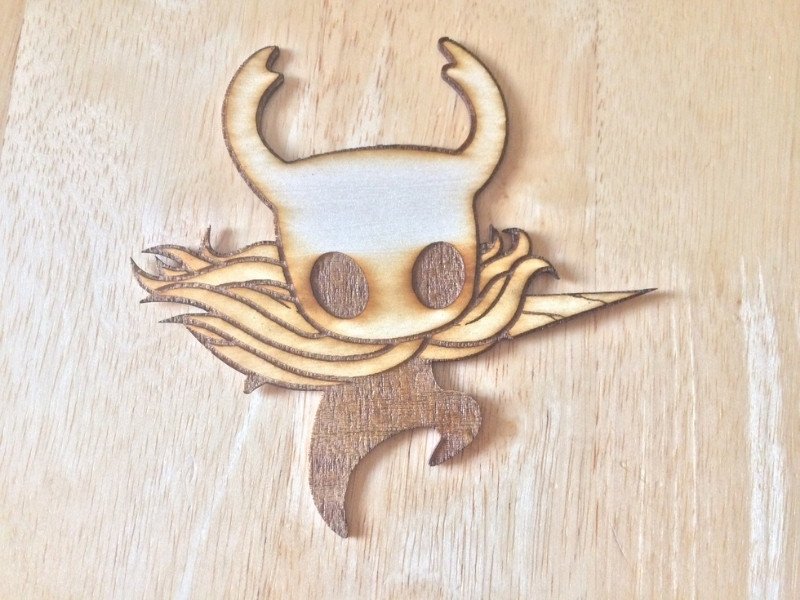
Hollow Knight
To cap things off and put the Longer Ray 5’s shading, cutting, and engraving capabilities to the test in one fell swoop, we processed and created a two-layer image of the nameless protagonist from the indie video game hit Hollow Knight. One layer to cut, set to 300 mm/s at 90% power, and one to engrave, tuned to 2000 mm/m and 80% power.
Despite light burn blemishes, the overall result is exceedingly good, with a particularly impressive engraved layering and solid shading. The Ray 5’s cutting was flawless, much like the cat above. We’re confident the Ray 5 can push out even cleaner and crisper results with some more fine-tuning.
Safety and Odors
The Longer Ray 5 comes decked out with several safety protection features – thermal, movement, emergency stop button, and a red acrylic shroud around the laser module. The movement protection is too sensitive for our liking, triggering with as little pressure as a light touch. But, safety first, after all.
Like all open-design engravers and cutters, the Longer Ray 5 produces odors and smoke that vary in intensity and pungency depending on the material used. Wood engraving produces light smoke with a burn smell that lingers for a little while afterwards. Tile produced that distinctive heavy, chalky smell you’d get using a circular saw.
Good ventilation is critical here, but cracking open a few windows could prove a problem given that the protective shroud doesn’t cover the backside of the module. That could potentially lead to the laser bouncing off open windows, which could lead to serious injury if your neighbor happens to be tending to their hydrangeas at the wrong moment.
Not a deal-breaker. But, like all laser engraving, don’t skimp on having the proper setup and safety measures.
Verdict
Overall, color us impressed. The Longer Ray 5 is a fantastic DIY machine. A little more clarity in the assembly and setup process wouldn’t go amiss, but we’re hard-pressed to find any other meaningful issues beyond this.
The laser’s 5.5 W power naturally introduces a cap on what you can engrave and cut. But, for what Longer sets out to offer (chiefly softwood cutting and engraving), the Ray 5 rises to the occasion reliably.
In our experience, results are only ever hampered by poor image/vector quality and improper settings – both attributable to the user – rather than the hardware. The Ray 5 didn’t waver or stumble whatever we threw its way during our testing.
One of our favorite features is offline printing via SD card. Removing the need to tether the engraver to a computer via a USB cable screams convenience.
We have no qualms recommending the engraver to DIY enthusiasts, first-time users, and even budding small businesses looking for a cost-effective solution. Though the Longer Ray 5’s MSRP sits at $500.00, it has dropped lower recently. As of writing, Longer’s website has it down to $339.00 – a genuine bargain.
Full Specifications
- Working area: 400 x 400 mm (15.75 x 15.75 In)
- Z-height clearance: 50 mm
- Min engraving speed: 40 mm/min
- Max engraving speed: 6000 mm/min
- Assembled size: 61 x 67 x 20 cm (24.01 x 26.38 x 0.79 inch)
- Operating temperature: -20 – 50°
- Laser technology: Diode Laser
- Wavelength: 450-460 nm
- Optical output: 5 W
- Focus type: fixed focus, 30mm focal range
- Dot size at optimal focus: 0.08 x 0.08 mm
- Connectivity: USB, TF Card, Wi-Fi
- Software: LightBurn and LaserGRBL
- Supported file formats: BMP, JPG, PNG, DXF, AI, SVG, and more
- Supported engraving materials: wood, paper, plastic, leather, PCB board, aluminum oxide, non-reflective plating and lacquered metal
- Supported cutting materials: cardboard, non-woven fabric, light wood, Acrylic material, thin plastic board
Other articles you may be interested in:
- Ortur Laser Master 2 Pro review
- Ortur Laser Master 3 review
- Ortur LM3 vs xTool D1 Pro
- Snapmaker 2.0 A350 laser and CNC review
- The best laser engravers and cutters buyer’s guide
- The coolest laser engraved and cut project ideas